> ## Documentation Index
> Fetch the complete documentation index at: https://docs.bright-sdk.com/llms.txt
> Use this file to discover all available pages before exploring further.
# Bright SDK for MacOS - Integration Guide
> This guide is for developers who want to monetize MacOS applications with Bright SDK.
export const UpdateSDK = ({platform}) => <>
Run the tool with the --update flag. It will automatically fetch and replace brdsdk.xcframework in place without losing your config or consent flow settings:
iOS:
{`npx github:BrightSDK/bright-sdk-integration --platform ios --update`}
tvOS:
{`npx github:BrightSDK/bright-sdk-integration --platform tvos --update`}
Updating in an Xcode Project
- Download the latest SDK from the Bright SDK Dashboard and unzip it.
- Replace
brdsdk.xcframework in its current location (e.g., <MyProject>/Libraries).
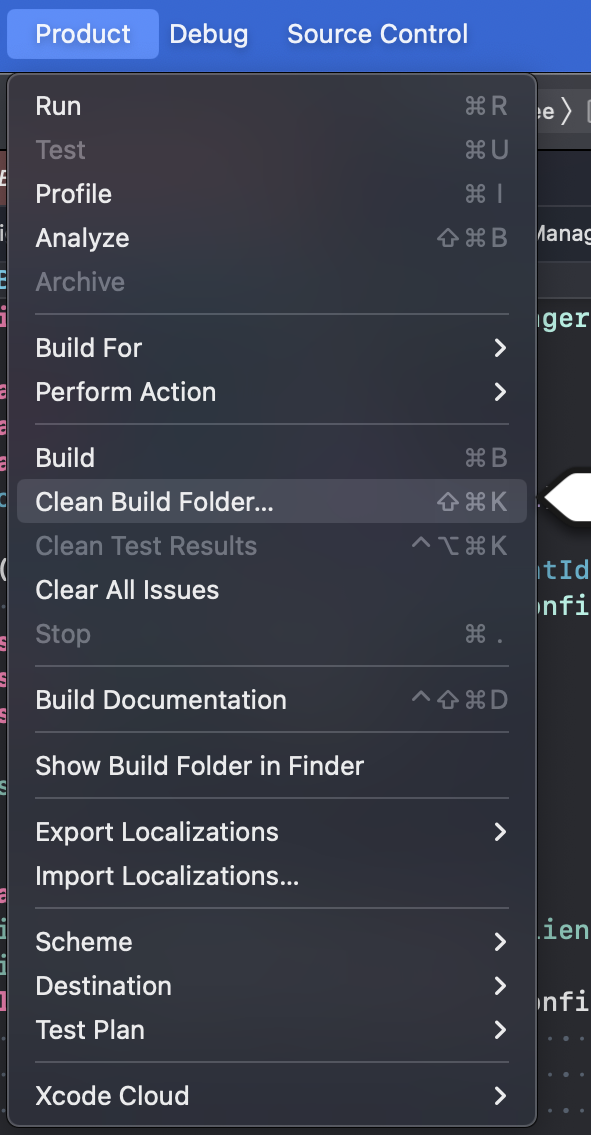
- Clean the build folder: Product → Clean Build Folder in Xcode.
If cleaning doesn't help, clear DerivedData...
{platform === "ios" && <>
Updating in a Unity Project
- Remove the existing
brdsdk.unitypackage asset from Unity Editor.
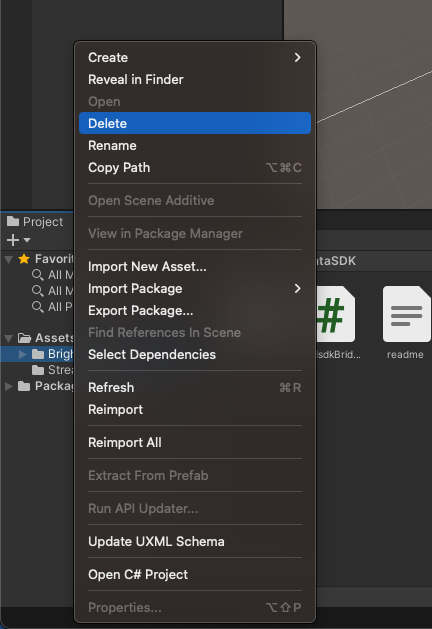
Re-import the new package following Import the SDK Package Step.
}
;
export const SubmitIntegrationReview = ({platform}) => <>
Pre-Submission Requirements
The Bright Data SDK compliance team will verify:
- SDK integration UX and functionality.
- Consent screen implementation.
- Opt-out mechanism.
- User value proposition.
-
Submission Process
Self-check using an emulator/simulator is not yet supported. Currently, self-check can only be performed on a real device.
-
Run Self-Check (takes a few minutes) — Complete the self-check verification to identify potential issues before submission:
- Navigate to the Bright SDK Dashboard and click your appID.
- Scroll down to "Implementation self-check", click "Get started".
- Install the app on the test device and follow the instructions.
- If the self-check passed successfully, submit it for review!
If the SDK isn't initializing / peer not connecting:
- Verify the correct App ID is used, confirm the SDK service is running.
- Check there aren't multiple SDK apps running from the same IP — that can interfere.
- If nothing helps, check with our team.
-
Submit for review via Dashboard
- Navigate to the Bright SDK Dashboard.
- Select your app ID.
- Click "Submit for Review".
- Complete the compliance checklist to validate adherence to guidelines.
- Upload your package.
-
Store submission — You will be notified by email once your app is approved for release. The app status in the dashboard will also be changed to "Approved".
{platform !== "ios" && platform !== "macos" && platform !== "android" && <>
Guides to help you through the store review:
}
-
Review Resources
{platform === "ios" && <>
For iOS/tvOS — How to submit your build:
- Paste a public link in the "Submit for Review" window on the dashboard, OR
- Send via TestFlight to all 4 addresses below (one invite per address):
| Email |
| sdk@brightdata.com |
| sdk+1@brightdata.com |
| sdk+2@brightdata.com |
| sdkcompliance@brightdata.com |
}
We will review each app up to 3 times. 3 rejections or failure to meet minimum quality standards may result in final rejection.
;
export const Tos = ({platform}) => <>
App Store Privacy Settings
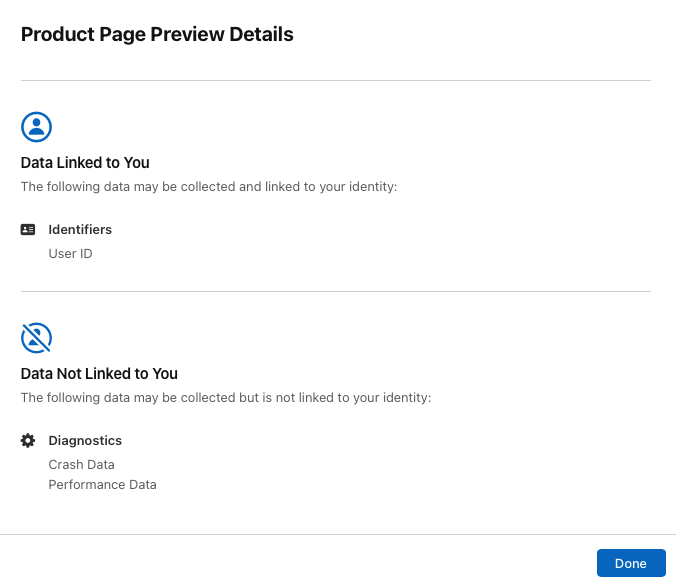
Bright SDK does not collect any personal information except the user's IP address. Bright Data knows that a certain IP exists but not who owns it or any other information.
{platform === "ios" && <>
Your existing privacy settings may already cover this (e.g., if you have ads in your app). If not, update your App Store privacy settings to include at minimum what Bright Data collects:
 }
}
Update Your FAQ and Terms of Service
Add the following text to your Terms of Service web page (TOS, EULA, or Privacy Policy):
In return for premium features of '[Your App Name]', you may choose to be a peer on the Bright Data network. By doing so, you agree to have read and accepted the Bright SDK EULA and Bright Data's Privacy Policy.
You may opt out of the Bright Data network by [add clear opt-out instructions].
Requirements
- Include all text and links as provided above.
- Any additional Bright SDK-related content must be shared during the app review process for approval.
;
export const CustomConsentWin = ({platform}) => <>
Subject to Bright SDK approval, you can create and use your own consent screen with Bright SDK. Please follow the following guidelines.
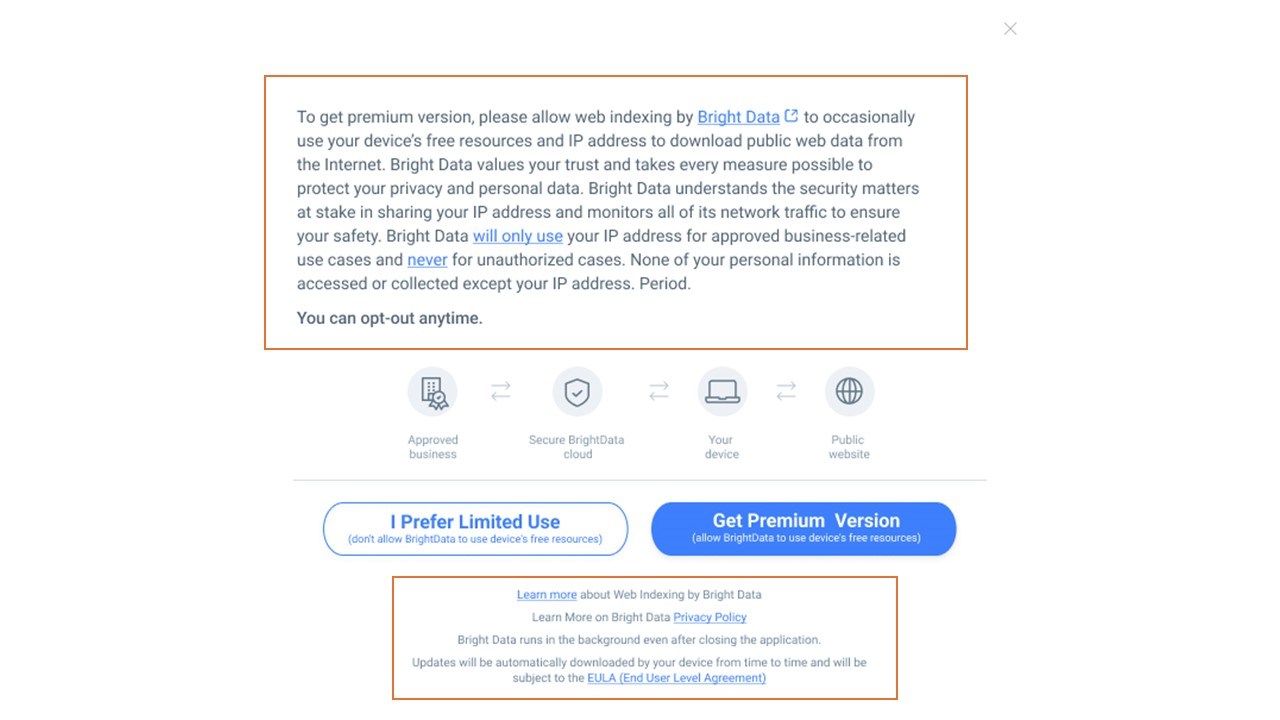
This is what it looks like on the default Bright SDK screen:
Design Requirements:
Your custom consent screen must comply with the following requirements:
- Mandatory Text - Your screen must include the following text exactly as written:
{`" To [Benefit to user], please allow Web Indexing by Bright Data to use your device's free resources and IP address to download public web data from the Internet.

      Bright Data values your trust and takes every measure possible to protect your privacy and personal data.

      Bright Data understands the security matters at stake in sharing your IP address and monitors all of its network traffic to ensure your safety.

      Bright Data will only use your IP address for approved business-related use cases and never for unauthorized cases.

      None of your personal information is accessed or collected except your IP address."`}
- Additional Required Text
{`"Learn more about web indexing by Bright Data
      Learn more about Bright Data’s Privacy Policy
      Bright Data runs in the background even after closing the application.
      Updates will be automatically downloaded by your device from time to time and will be subject to the EULA (End User Level Agreement)"`}
Important: "Learn more", "Privacy Policy" and "EULA (End User Level Agreement)" should redirect to the relevant links.
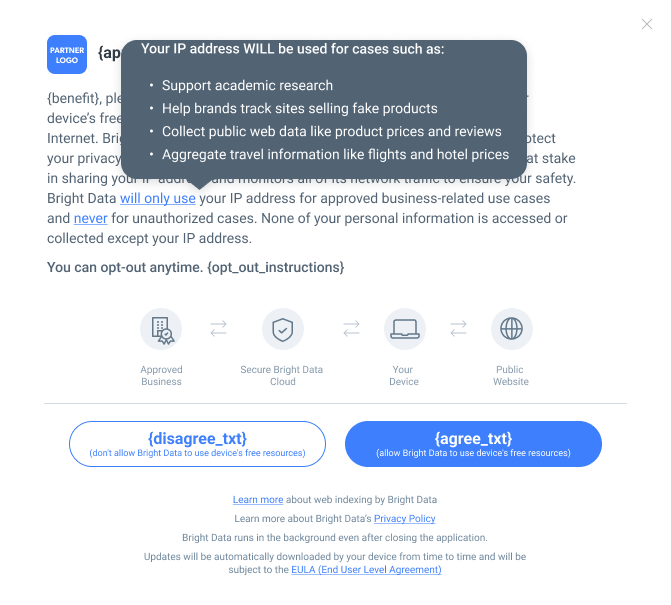
- Interactive Popups - Clicking on "will only use" → Opens popup:
{`"Your IP address WILL be used for cases such as:
      Support academic research
      Help brands track sites selling fake products
      Collect public web data like product prices and reviews
      Aggregate travel information like flights and hotel prices "`}
Example:
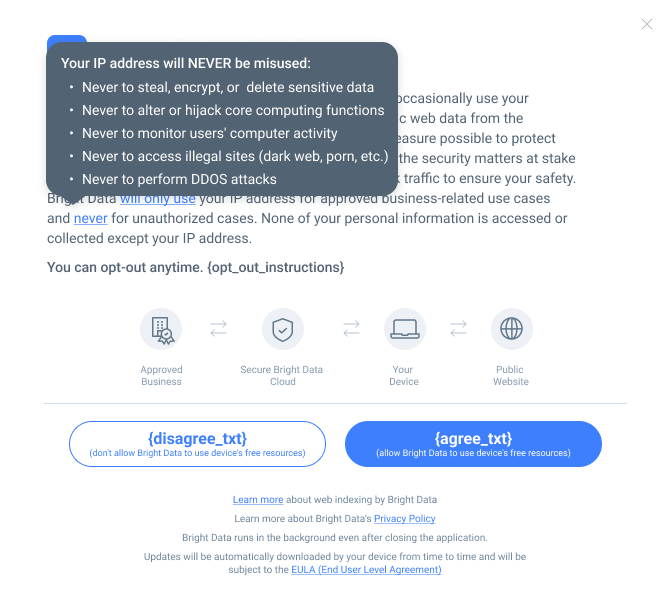
Clicking on "never" → Opens popup:
{`"Your IP address will NEVER be misused:

Never to steal, encrypt, or delete sensitive data
Never to alter or hijack core computing functions
Never to monitor users' computer activity
Never to access illegal sites (dark web, porn, etc.)
Never to perform DDOS attacks "`}
Example:
Integration Code:
{platform === "win" && <>
- Skip Default Consent Screen - Pass
SkipConsent = true in the SDK's initialization method to prevent showing the default consent screen.
- Track Consent Screen Display - When your external consent screen is displayed, call
NotifyShowConsent() method.
- Handle User Response
- The opt-in button (e.g. "I Agree”) should call
ExternalOptIn() method.
- The opt-out button (e.g. "I Disagree”) should call
OptOut() method.
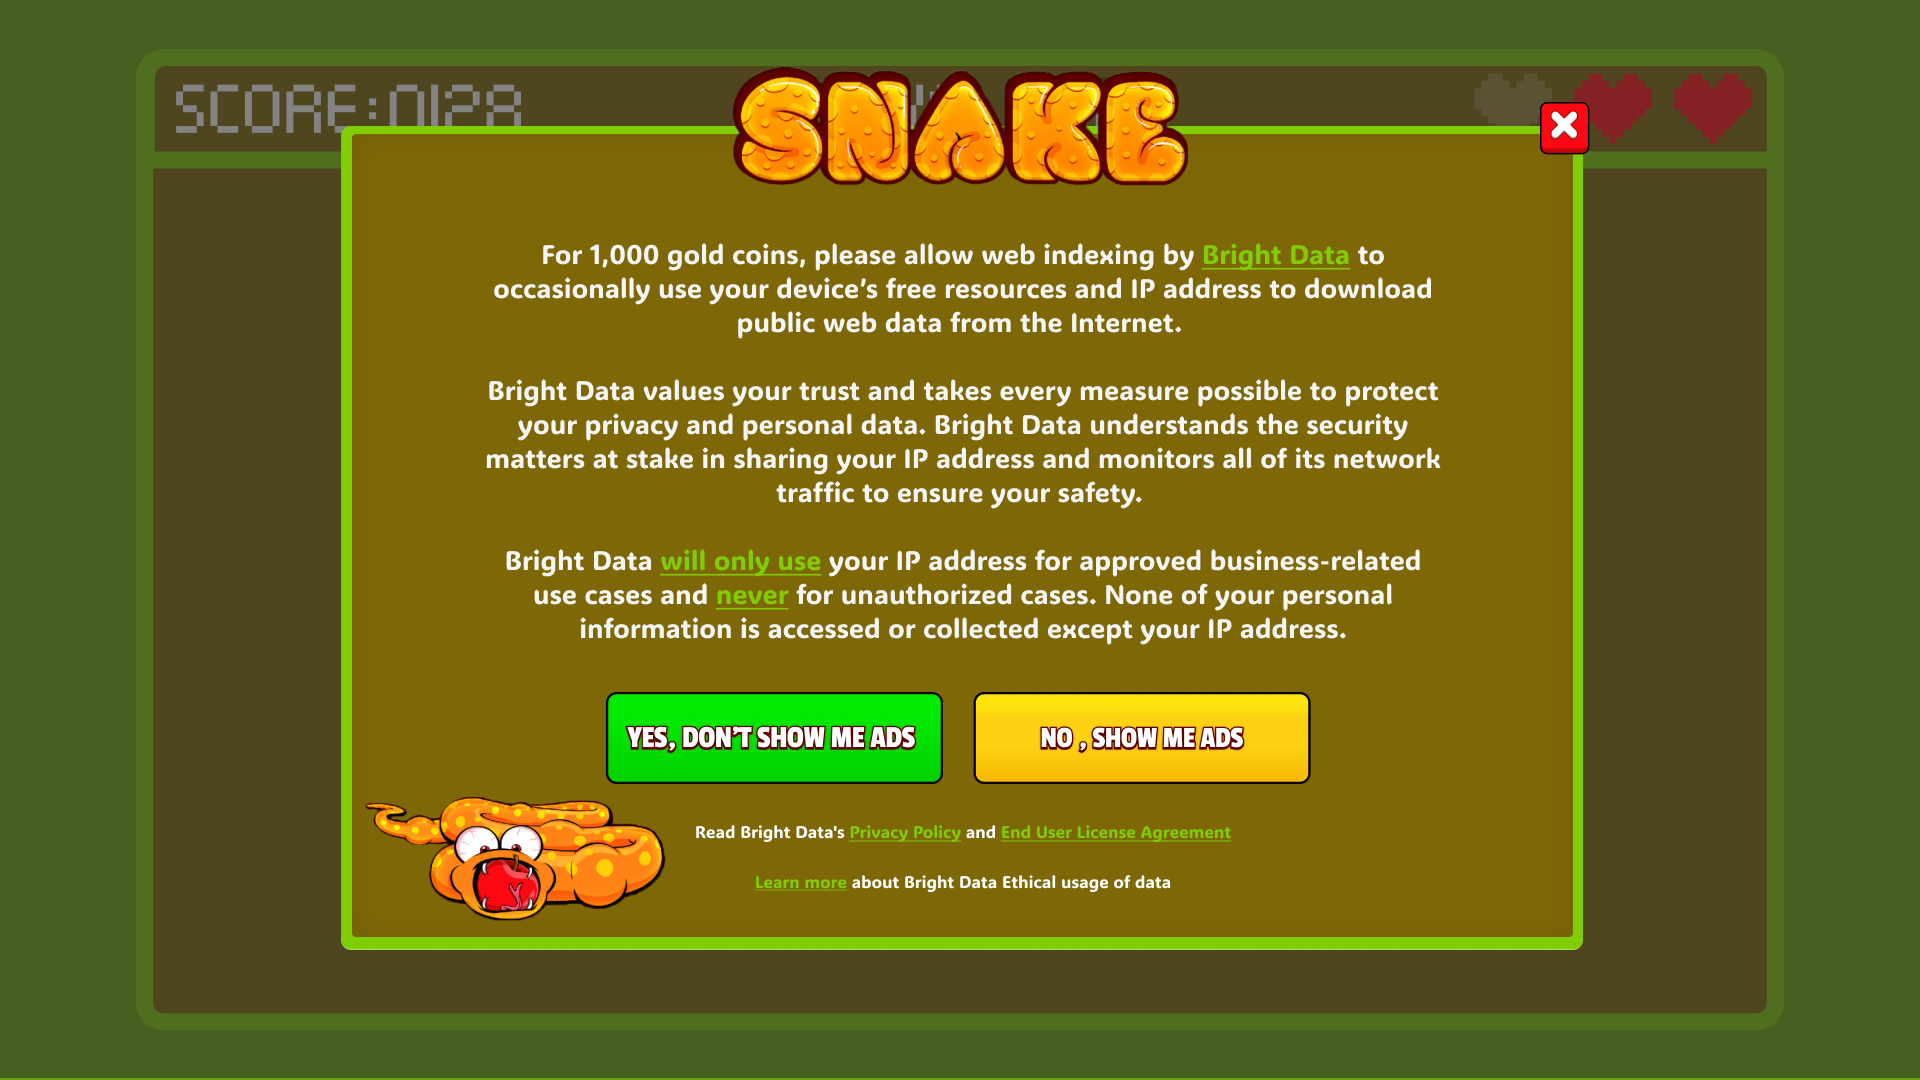
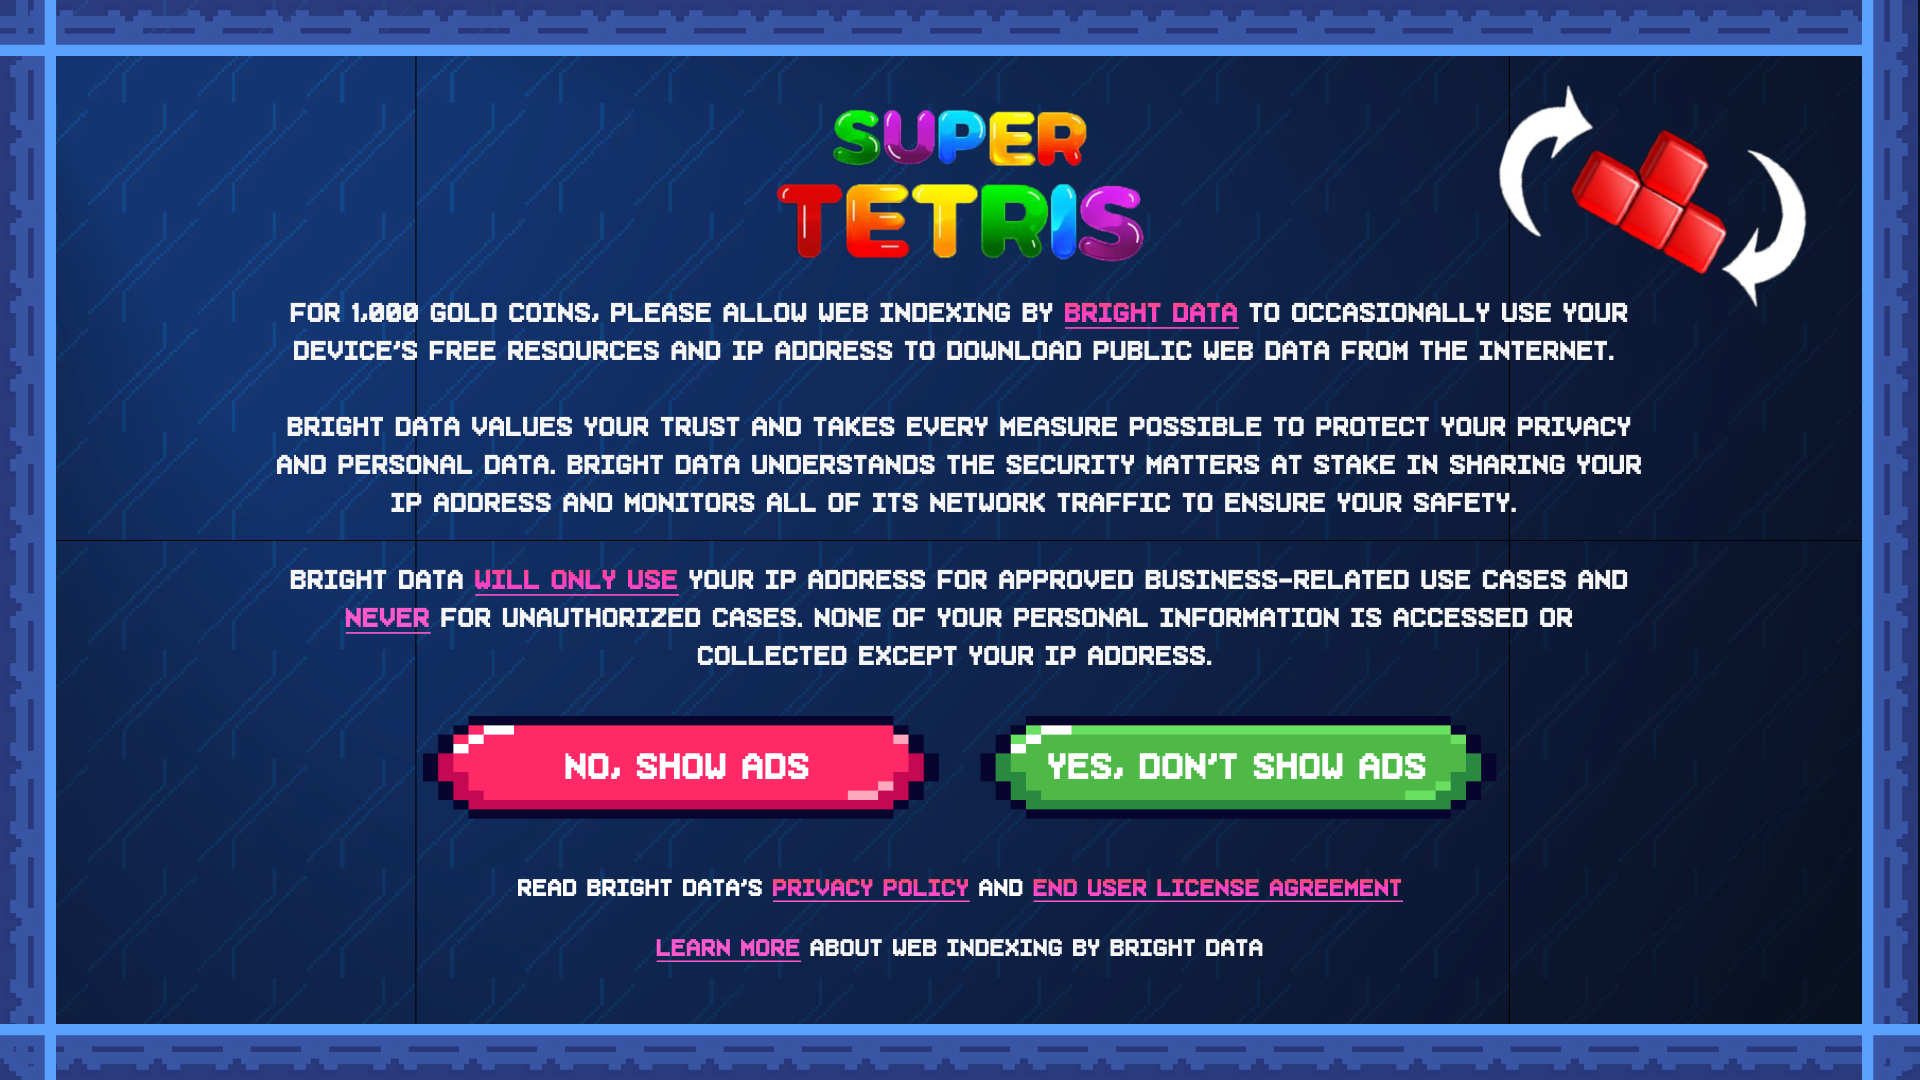
Example Custom Screens:
 }
{platform === "macos" && <>
}
{platform === "macos" && <>
- Pass
skip_consent: true (or equivalent) in the SDK initializer to prevent the default consent screen from showing.
- The opt-in button (e.g., "I Agree") should call
external_opt_in().
- The opt-out button (e.g., "I Disagree") should call
opt_out().
- After presenting your custom screen, call
consent_shown().
}
;
export const OptInOut = ({platform}) => <>
The user must always be able to opt out of Bright SDK after giving their initial consent.
Your app must include a settings option allowing users to opt in or out at any time. This is typically placed in a Settings menu.
Requirements:
Every time the user toggles Web Indexing ON, the consent screen must reappear — regardless of any previous opt-in.
{platform === "ios" && <>
Implementation:
- Use
get_choice() to get the current status for the switch/checkbox.
- When the user disables the switch → call
opt_out().
- When the user enables the switch → call
show_consent() (the user must actively opt in through the consent screen).
- Use the
on_choice_change callback to keep the UI automatically updated.
}
{platform === "macos" && <>
Implementation:
- Set the initial checkbox state based on the current SDK choice:
{`bright_sdk_checkbox.state = (sdk?.choice == .peer) ? .on : .off`}
- Add control logic for the checkbox:
{`@IBOutlet weak var bright_sdk_checkbox: NSButton!

@IBAction func bright_sdk_checkbox_action(_ sender: NSButton) {
    if bright_sdk_checkbox.state == NSControl.StateValue.off {
        bright_sdk_checkbox.state = .off
        sdk?.opt_out()
    } else {
        bright_sdk_checkbox.state = .on
        show_bright_sdk()
    }
}`}
}
There is no way to directly opt in. Only the user can decide. You must show the consent screen — opt-in happens automatically only if the user agrees.
Value text suggestions:
| State | Example text |
|---|
Opted out | "Enable to see fewer ads" |
Opted out | "Enable to get 100 extra coins" |
Opted out | "Enable to enjoy premium features" |
Opted in | "When enabled you see fewer ads" |
Opted in | "When enabled you get 100 extra coins" |
Refrain from using technical terms like "opt in" / "opt out" — always speak in terms of user value.
You may add a confirmation dialog to discourage opting out (e.g., "If you disable Web Indexing, you will start seeing ads. Continue?"), and a confirmation message after opting out (e.g., "Web Indexing disabled. You can re-enable it anytime from Settings.")
Common mistakes to avoid:
| Issue |
Guidance |
| Label reads "Bright" or "Bright SDK" |
Label must read "Web Indexing" |
| No value text |
Always include text describing what the user gains |
| No "Learn more" link |
Required — must link to the URL above |
| Switch doesn't reflect current state |
Switch must always show the true current status |
;
### Requirements
* macOS 10.15 or newer.
* Xcode (latest recommended).
* Bright SDK for macOS ([latest](https://bright-sdk.com/cp/docs/sdk/macos)).
### Important Notes
* Users **must always** voluntarily decide to opt in after seeing the consent screen, and **must always** have an easy way to opt out.
* Bright Data **reviews** SDK integration after initial release and regularly thereafter. Your account will be **terminated** if you violate the guidelines in this document.
* App Sandbox is **not supported**. If your app has the sandbox entitlement enabled, the SDK will **not function**.
* Bright Data recommends offering value in exchange for opting in (e.g., fewer ads, bonus coins, premium features). However, simply asking for user support is also acceptable.
If you haven't done this yet, log in to [your dashboard](https://bright-sdk.com/cp/apps) and create your app ID first.
You can set up the Bright SDK framework in your macOS app in two ways:
* [**Using the Bright SDK Integration CLI Tool**](https://brightsdk.github.io/bright-sdk-integration/) Recommended - automatically downloads the SDK, extracts the framework, and patches your Xcode project with the necessary references, copy phases, build settings, and re-sign script.
* **Manually** - download the SDK from the dashboard, unzip it, and copy the files yourself.
Either way, you will still need to add the SDK initialization code to your app.
Option A - Using the Integration CLI Tool Recommended}>
Run the tool using the [`bright-sdk-integration`](https://brightsdk.github.io/bright-sdk-integration/) CLI. See the [Apple example](https://github.com/BrightSDK/bright-sdk-integration-example-apple) for full setup instructions.
The tool will:
* Download the latest BrightSDK zip from `cdn.bright-sdk.com/static/`.
* Extract `brdsdk.framework` and `net_updater.app` into `BrightSDK/`.
* Patch your `project.pbxproj` — adding `brdsdk.framework` and `net_updater.app` with Embed & Sign, setting `FRAMEWORK_SEARCH_PATHS` and `LD_RUNPATH_SEARCH_PATHS`.
* Add a Copy Files build phase placing `net_updater.app` under `Contents/Library/LoginItems`.
* Add a Resign run-script build phase using `resign_net_updater.sh`.
* Set build settings: `NET_UPDATER_ENTITLEMENTS` and `ENABLE_USER_SCRIPT_SANDBOXING = NO`.
* Save `brd_sdk.config.json` for future runs.
Once the tool completes, skip to [Step 3 - Integrate Bright SDK](#integrate-bright-sdk).
Download the latest Bright SDK using the [Bright SDK downloader](https://brightsdk.github.io/bright-sdk-downloader-rs/). Unzip it.
**SDK Structure**
```text theme={null}
brdsdk.framework
net_updater.app
net_updater.entitlements
resign_net_updater.sh
```
**SDK Overview**
| Component | Description |
| :------------------------- | :----------------------------------------------------------------------- |
| `brdsdk.framework` | SDK control API |
| `net_updater.app` | SDK background control service |
| `net_updater.entitlements` | Entitlements file required for re-signing `net_updater` |
| `resign_net_updater.sh` | Script used in build phases to re-sign `net_updater` for your Apple team |
Before using `brdsdk.framework` and `net_updater.app`, additional Xcode project configuration steps are required — see [Project Setup](https://docs.bright-sdk.com/integration-guides/mac-os#option-b-manual:~:text=Integrate%20Bright%20SDK-,Project%20Setup,-Add%20the%20Framework).
**CLI Tool users:** `brdsdk.framework` and `net_updater.app` are already added and fully configured - skip to [Import the SDK](https://docs.bright-sdk.com/integration-guides/mac-os#option-b-manual:~:text=will%20not%20function.-,Import%20the%20SDK,-In%20your%20AppDelegate).
**Add the Framework and Service to Your Target**
1. In Xcode, select your target and navigate to the **General** tab.
2. In the **Frameworks, Libraries, and Embedded Content** section, add both `brdsdk.framework` and `net_updater.app`.
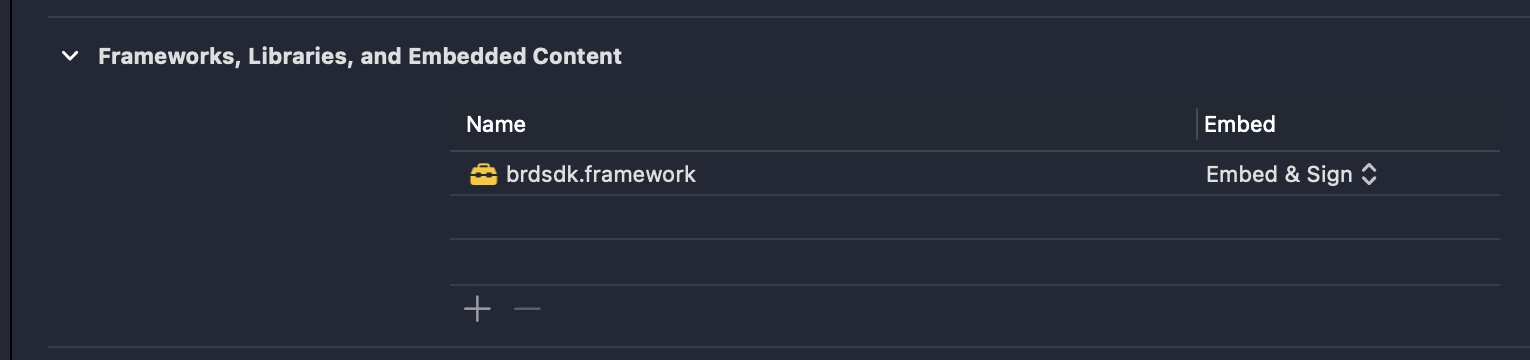 3. Both items will now appear in the project structure.
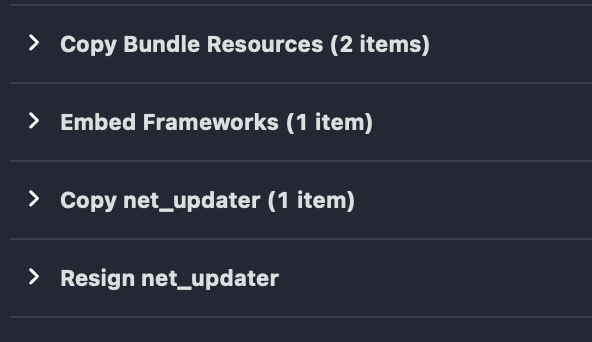
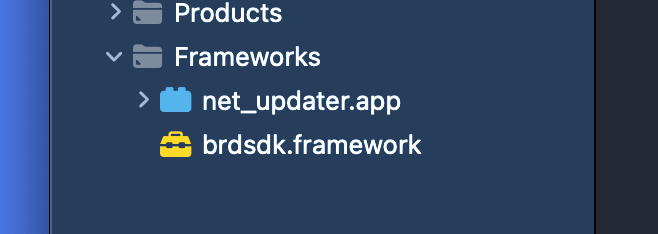 **Configure net\_updater Copy Location**
1. Navigate to **Build Phases**.
2. In the **Copy Bundle Resources** section, remove `net_updater`.
**Configure net\_updater Copy Location**
1. Navigate to **Build Phases**.
2. In the **Copy Bundle Resources** section, remove `net_updater`.
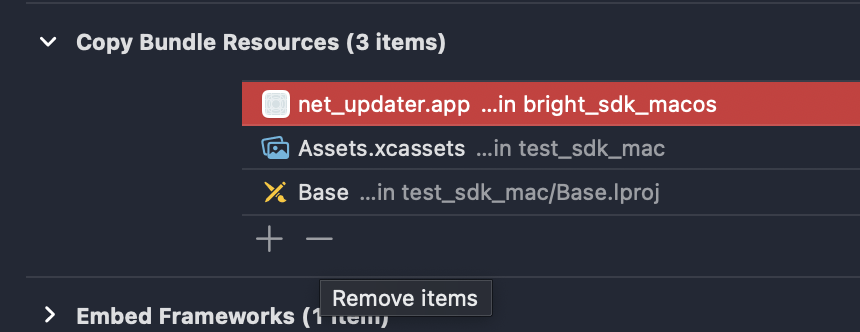 3. Add a new **Copy Files** build phase:
* Set **Destination** to `Wrapper`.
* Set **Subpath** to `Contents/Library/LoginItems`.
* Add `net_updater` to this phase.
3. Add a new **Copy Files** build phase:
* Set **Destination** to `Wrapper`.
* Set **Subpath** to `Contents/Library/LoginItems`.
* Add `net_updater` to this phase.
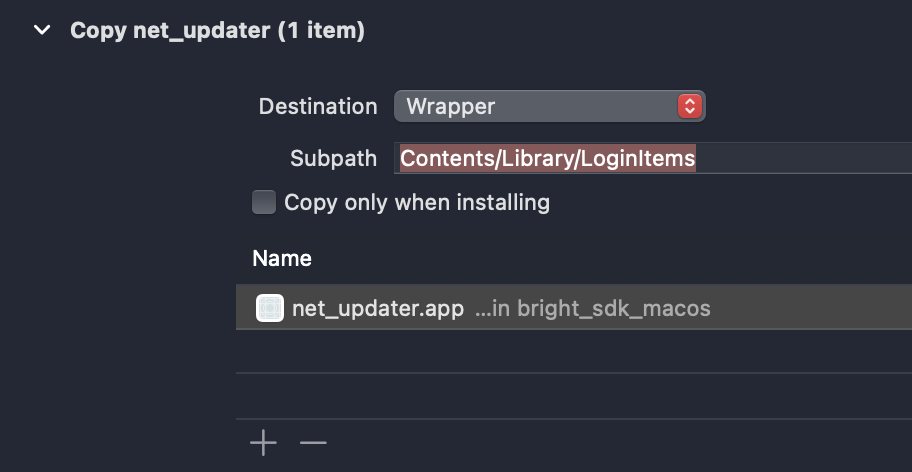 **Add Supporting Files**
* Copy `net_updater.entitlements` and `resign_net_updater.sh` into your project folder.
* These files do not need to be added to any Xcode target.
* `net_updater.entitlements` must be placed under the `${PROJECT_DIR}` path.
**Configure Build Settings**
In the **Build Settings** tab of your main app target, create a custom setting:
* **Key:** `NET_UPDATER_ENTITLEMENTS`
* **Value:** Path to `net_updater.entitlements` relative to `${PROJECT_DIR}`
* Set `ENABLE_USER_SCRIPT_SANDBOXING` to `NO`
**Add Re-sign Build Phase**
* Add a **Run Script** build phase after the `net_updater` copy phase (e.g., name it `"Resign net_updater"`).
* Assign `resign_net_updater.sh` as its content (or paste the script contents directly).
**Add Supporting Files**
* Copy `net_updater.entitlements` and `resign_net_updater.sh` into your project folder.
* These files do not need to be added to any Xcode target.
* `net_updater.entitlements` must be placed under the `${PROJECT_DIR}` path.
**Configure Build Settings**
In the **Build Settings** tab of your main app target, create a custom setting:
* **Key:** `NET_UPDATER_ENTITLEMENTS`
* **Value:** Path to `net_updater.entitlements` relative to `${PROJECT_DIR}`
* Set `ENABLE_USER_SCRIPT_SANDBOXING` to `NO`
**Add Re-sign Build Phase**
* Add a **Run Script** build phase after the `net_updater` copy phase (e.g., name it `"Resign net_updater"`).
* Assign `resign_net_updater.sh` as its content (or paste the script contents directly).
 App Sandbox is not supported. If your app has the sandbox entitlement, the SDK will not function.
In your `AppDelegate.swift`, import the Bright SDK:
```swift theme={null}
import Cocoa
// ... other imports ...
import brdsdk
```
Initialize the SDK once in your `AppDelegate`, typically inside `applicationDidFinishLaunching`. Create a dedicated setup function (e.g., `start_bright_sdk`) to keep initialization clean. Should be invoked only once.
```swift theme={null}
@NSApplicationMain
class AppDelegate: NSObject, NSApplicationDelegate {
var sdk: brd_api?
func applicationDidFinishLaunching(_ aNotification: Notification) {
// ...
try? start_bright_sdk()
// ...
}
func start_bright_sdk() throws {
sdk = try brd_api(campaign: nil,
on_choice_change: { [weak self] new_choice in
// Handle user selection
switch new_choice {
case .peer:
// e.g. update local settings — SDK enabled
myapp.options.set_bright_sdk_enabled()
case .notPeer:
// e.g. start a subscription process
start_subscription_process()
case .none:
// e.g. update local settings — SDK disabled
myapp.options.set_bright_sdk_disabled()
}
})
show_bright_sdk()
}
func show_bright_sdk() {
sdk?.show_consent(force: true, on_choice: { _ in })
}
}
```
We prioritize user experience. Ensure your app maintains good performance.
Performance Guidelines:
1. ✅ No input lag - ensure responsive UI interactions.
2. ✅ Average CPU load: ≤ 50%.
3. ✅ RAM usage: ≤ 90%.
**Important:** If system load is too high, we cannot use the device's free resources. Such devices will not be counted as active and will not generate revenue.
Before submitting, verify that the SDK is running correctly on your device:
1. Compile and run your app, then click **"I Agree"** in the SDK consent dialog.
2. Open a terminal and run:
```shell theme={null}
ps -ef | grep [n]et_
```
You should see 1 process running from inside your app directory: `net_updater`.
3. Navigate to:
```text theme={null}
/Users/{USER}/Library/Group Containers/.com.brdsdk.shared
```
4. Look for the `cid` file matching your Bundle ID. It should look similar to:
```text theme={null}
10.59.36.4-ccaa3e53/ls17c2p443_10.59.36.4_60015
```
**If the SDK isn't initializing / peer not connecting:**
1. Verify the correct App ID is used, confirm the SDK service is running.
2. Check there aren't multiple SDK apps running from the same IP — that can interfere.
3. If nothing helps, check with our team.
To be updated
App Sandbox is not supported. If your app has the sandbox entitlement, the SDK will not function.
In your `AppDelegate.swift`, import the Bright SDK:
```swift theme={null}
import Cocoa
// ... other imports ...
import brdsdk
```
Initialize the SDK once in your `AppDelegate`, typically inside `applicationDidFinishLaunching`. Create a dedicated setup function (e.g., `start_bright_sdk`) to keep initialization clean. Should be invoked only once.
```swift theme={null}
@NSApplicationMain
class AppDelegate: NSObject, NSApplicationDelegate {
var sdk: brd_api?
func applicationDidFinishLaunching(_ aNotification: Notification) {
// ...
try? start_bright_sdk()
// ...
}
func start_bright_sdk() throws {
sdk = try brd_api(campaign: nil,
on_choice_change: { [weak self] new_choice in
// Handle user selection
switch new_choice {
case .peer:
// e.g. update local settings — SDK enabled
myapp.options.set_bright_sdk_enabled()
case .notPeer:
// e.g. start a subscription process
start_subscription_process()
case .none:
// e.g. update local settings — SDK disabled
myapp.options.set_bright_sdk_disabled()
}
})
show_bright_sdk()
}
func show_bright_sdk() {
sdk?.show_consent(force: true, on_choice: { _ in })
}
}
```
We prioritize user experience. Ensure your app maintains good performance.
Performance Guidelines:
1. ✅ No input lag - ensure responsive UI interactions.
2. ✅ Average CPU load: ≤ 50%.
3. ✅ RAM usage: ≤ 90%.
**Important:** If system load is too high, we cannot use the device's free resources. Such devices will not be counted as active and will not generate revenue.
Before submitting, verify that the SDK is running correctly on your device:
1. Compile and run your app, then click **"I Agree"** in the SDK consent dialog.
2. Open a terminal and run:
```shell theme={null}
ps -ef | grep [n]et_
```
You should see 1 process running from inside your app directory: `net_updater`.
3. Navigate to:
```text theme={null}
/Users/{USER}/Library/Group Containers/.com.brdsdk.shared
```
4. Look for the `cid` file matching your Bundle ID. It should look similar to:
```text theme={null}
10.59.36.4-ccaa3e53/ls17c2p443_10.59.36.4_60015
```
**If the SDK isn't initializing / peer not connecting:**
1. Verify the correct App ID is used, confirm the SDK service is running.
2. Check there aren't multiple SDK apps running from the same IP — that can interfere.
3. If nothing helps, check with our team.
To be updated