> ## Documentation Index
> Fetch the complete documentation index at: https://docs.bright-sdk.com/llms.txt
> Use this file to discover all available pages before exploring further.
# Bright SDK for Tizen - Integration Guide
> This guide is for developers who want to monetize TizenOS applications with Bright SDK.
export const UpdateSdkVersion = ({platform}) => {
const integrationLink = platform === 'tizen' ? "https://brightsdk.github.io/bright-sdk-integration/" : "https://brightsdk.github.io/bright-sdk-integration/";
const dashboardLink = platform === 'tizen' ? "https://brightsdk.github.io/bright-sdk-downloader-rs/" : "https://brightsdk.github.io/bright-sdk-downloader-rs/";
return <>
When a new version of Bright SDK is released, use the bright-sdk-integration CLI tool to update your SDK files automatically.
The tool will download the latest SDK, replace the existing files in your app, and keep your brd_sdk.config.json up to date - without touching your app code.
Make sure to save or commit any uncommitted changes before running the update.
Option A - Using the Integration Tool Recommended}>
If you already have a brd_sdk.config.json in your project (generated during the initial integration), run:
bright-sdk-integration /path/to/your/app/brd_sdk.config.json
Or navigate to your project directory and run non-interactively:
npm run update
Or interactively (prompts for any missing values):
npm run update:interactive
The tool will:
- Download the latest SDK zip from
cdn.bright-sdk.com/static/
- Replace
brd_api.js and brd_api.helper.js in {platform === 'tizen' ? app/js/ : 'your app directory'}
- Replace the
service/ directory
- Update the version recorded in
brd_sdk.config.json
If you don't have a config file yet, run the tool in interactive mode, and it will generate one for future updates:
{`npx github:BrightSDK/bright-sdk-integration --platform ${platform || 'webos'}`}
To reset and remove all SDK files and restore a clean state:
npm run reset
If you prefer to update manually:
{platform !== 'tizen' ?
- Download the latest Bright SDK zip from the Bright SDK downloader.
-
Unzip and replace the following files in your project:
brd_api.js → copy to your app JS directoryservice/ → replace the entire service directory
-
Update the package.json: open
package.json and set a correct name attribute. Preserve the .brd_sdk postfix at the end. Leave the rest of the attributes untouched in this file.
-
Update the services.json: open
services.json and set a correct id, services[0].id, and services[0].name attributes. Preserve the .brd_sdk postfix at the end. Leave the rest of the attributes untouched in this file.
:
- Download the latest Bright SDK zip from the Bright SDK downloader.
- Replace
brd_api.js with the newer version.
- Delete the
service directory and replace it with the newer version.
- Copy Service Folder: copy
sdk/service folder to your project.
-
Add Service to config.xml: Add the following to your
config.xml:
{`...


  WebUIService
  WebUIService


...`}
Important: Replace brdsample0 with your package ID.
}
{platform === "webos" && <>
Hosted Web App Considerations
Important: if your app is a Hosted Web App maintain SDK file version consistency across all components.
Since brd_api.js is typically hosted on your web server, ensure backward compatibility with previous app versions before submitting to LG.
Example:
- Current version:
www.mywebsite.com/myapp (keep old brd_api.js here).
- Updated version:
www.mywebsite.com/myapp/v2 (use new brd_api.js).
This approach allows older app installations to continue functioning while new versions use the updated SDK.
}
;
};
export const SubmitIntegrationReview = ({platform}) => <>
Pre-Submission Requirements
The Bright Data SDK compliance team will verify:
- SDK integration UX and functionality.
- Consent screen implementation.
- Opt-out mechanism.
- User value proposition.
-
Submission Process
Self-check using an emulator/simulator is not yet supported. Currently, self-check can only be performed on a real device.
-
Run Self-Check (takes a few minutes) — Complete the self-check verification to identify potential issues before submission:
- Navigate to the Bright SDK Dashboard and click your appID.
- Scroll down to "Implementation self-check", click "Get started".
- Install the app on the test device and follow the instructions.
- If the self-check passed successfully, submit it for review!
If the SDK isn't initializing / peer not connecting:
- Verify the correct App ID is used, confirm the SDK service is running.
- Check there aren't multiple SDK apps running from the same IP — that can interfere.
- If nothing helps, check with our team.
-
Submit for review via Dashboard
- Navigate to the Bright SDK Dashboard.
- Select your app ID.
- Click "Submit for Review".
- Complete the compliance checklist to validate adherence to guidelines.
- Upload your package.
-
Store submission — You will be notified by email once your app is approved for release. The app status in the dashboard will also be changed to "Approved".
{platform !== "ios" && platform !== "macos" && platform !== "android" && <>
Guides to help you through the store review:
}
-
Review Resources
{platform === "ios" && <>
For iOS/tvOS — How to submit your build:
- Paste a public link in the "Submit for Review" window on the dashboard, OR
- Send via TestFlight to all 4 addresses below (one invite per address):
| Email |
| sdk@brightdata.com |
| sdk+1@brightdata.com |
| sdk+2@brightdata.com |
| sdkcompliance@brightdata.com |
}
We will review each app up to 3 times. 3 rejections or failure to meet minimum quality standards may result in final rejection.
;
### Requirements
* Bright SDK for TizenOS requires Tizen 6.0 or newer.
* Latest Bright SDK version for Tizen (supports Tizen 2.4 and above).
* Latest Tizen Studio installed.
If you haven't done this yet, log in to [your dashboard](https://bright-sdk.com/cp/apps) and create your app ID first. **Format:** It generally consists of a 10-character alphanumeric package ID followed by a project name (e.g., `brightdata.actionGames`).
You can set up the Bright SDK in your Tizen app in two ways:
* [**Using the Bright SDK integration CLI tool**](https://brightsdk.github.io/bright-sdk-integration/) Recommended - automatically downloads the SDK, copies the required files into your app directory, and injects the script tags into `index.html`.
* **Manually** - Download the SDK from the sdk downloader, copy the files yourself, and add the script tags manually. Either way, you will still need to configure your app/service identifiers and add the SDK initialization code to your app.
Option A - Using the Integration Tool Recommended}>
Run the tool using the [bright-sdk-integration](https://github.com/BrightSDK/bright-sdk-integration) CLI. See the [Tizen example](https://github.com/BrightSDK/bright-sdk-integration-example-tizen) for full setup instructions. The tool will:
1. Download the latest BrightSDK zip from `cdn.bright-sdk.com/static/`.
2. Extract `brd_api.js` and `brd_api.helper.js` into `app/`.
3. Extract the `service/` directory for the background service.
4. Inject SDK script tags into `app/index.html`.
5. Save `brd_sdk.config.json` for future runs. Once the tool completes, skip to [Step 3 - Configure and Initialize the SDK](#configure-and-initialize-the-sdk).
Download the latest Bright SDK using the [Bright SDK downloader](https://bright-sdk.com/cp/docs/sdk/tizen), unzip it. **SDK Structure:**
**SDK Overview:**
* **sample\_app** - Demonstrates possible integration options. Represents the general architecture of Tizen TV applications and can also be used for [Tizen Web Applications](https://docs.tizen.org/application/web/index).
* **SDK Integration Components:**
1. **service directory** - The main engine containing all logic required to run the SDK. Must be copied next to your other services.
2. `brd_api.js` - Frontend interface implementing the consent screen. Must be integrated with your application's frontend.
**Prepare the Files**
1. **Copy Service Folder:** copy `sdk/service` folder to your project.
If you used the CLI tool in Option A, the `service/` directory is already in place - skip this sub-step.
2. Add Service to `config.xml`.
3. Add the following to your `config.xml`:
```xml theme={null}
...
WebUIService
WebUIService
...
```
**Important:** Replace `brdsample0` with your package ID.
**Package ID Naming Tip** - After creating a Tizen app, we recommend changing the package ID to something more readable using your partner ID from the Control Panel. Examples:
* `blUqHYQcnKEE.actionGames` → `brightdata.actionGames`
* `super_games` → `SuperGames` (remove illegal characters)
The `tizen_` prefix will be added automatically by the SDK.
**Embed SDK Dialog in Your Code**
You can use `sample_app` as a reference.
If you used the CLI tool in Option A, `brd_api.js`, `brd_api.helper.js`, and the script tags in `index.html` are already in place - skip this sub-step.
**Import brd\_api.js**
1. Copy `brd_api.js` into your app directory.
2. Import it from the main file responsible for app initialization.
3. After `brd_api.js` execution, the `brd_api` global object will be available.
```html theme={null}
...
...
```
**Add SDK Initialization**
Call `brd_api.init()` after page load to access all SDK methods.
Example:
```html theme={null}
...
...
...
```
**Consent behavior:**
* On first call, `brd_api.init()` will show a consent screen.
* The user must agree or disagree.
* Get the result by setting the `on_status_change` callback.
* The consent screen handles TV remote control input.
* You must disable your remote input processing when the consent screen is shown.
* `on_status_change` will be called after the consent screen is closed.
**Critical Requirement:** The user must always be able to opt-out of Bright SDK after giving their initial consent.
Regardless of the user's initial choice, you must add an option for users to opt-in/out at any time. This is usually placed in the settings menu.
**Requirements:**
1. **Add a switch labeled "Web Indexing"** Must clearly reflect current status (opted-in or opted-out).
* `brd_api.get_status().consent === true` → checked/on.
* `brd_api.get_status().consent === false` → unchecked/off.
2. **Add value text below the switch** Emphasize the benefits users get when opting in. ([see examples](#:~:text=Value%20Text%20Examples%3A))
3. **Include a way to give more information**
* Best practice: Include a QR code linking to: [https://brightdata.com/sdk/information?is\_tv=1](https://brightdata.com/sdk/information?is_tv=1)
* Accompany with text: "**Scan the QR Code to learn more about web indexing by Bright Data**".
* You can use:
1. Your own branded QR code.
2. [This QR code (SVG)](https://drive.google.com/file/d/1d1KCJIrc8L_5mQJFfOU3Bt5f4PadnImg/view?usp=sharing).
3. Hosted version: [https://media.bright-sdk.com/2023/09/qr-bright-sdk-faq.svg](https://media.bright-sdk.com/2023/09/qr-bright-sdk-faq.svg)
4. **UX Guidelines**
* You're free to choose the UX (radio button, switch, etc.).
* The opt-out option must be clearly labeled.
* Users must be able to freely opt-out.
5. **Behavior**
* Turning OFF → call `brd_api.opt_out()`.
* Turning ON → call `brd_api.show_consent()` (user action should open consent).
* Every time the user toggles Web Indexing **ON**, the consent screen must reappear — even if the user has previously opted in.
**Examples of opted-in and opted-out scenarios:**
**Value Text Examples:**
| When opted-out: | When opted-in: |
| -------------------------------- | --------------------------------------- |
| Enable to see fewer ads | When enabled you see fewer ads |
| Enable to get 100 extra coins | When enabled you get 100 extra coins |
| Enable to enjoy premium features | When enabled you enjoy premium features |
| Enable to get 2 free cars | When enabled you get 2 free cars |
| Enable to unlock more levels | When enabled you unlock more levels |
**Common Mistakes to Avoid:**
| Example | Issue |
| ------------------------------- | ---------------------------------------------------------- |
| Label: "Bright SDK" | ❌ Label should be "Web Indexing", not "Bright/Bright SDK" |
| Switch without value text | ❌ Missing text emphasizing value to users |
| Switch without status indicator | ❌ Switch should clearly show current opt-in/opt-out status |
| No "Learn More" option | ❌ Missing link/QR code to information page |
**Optional: Confirmation Dialogs -** You may add pop-up/confirmation dialogs to:
* **Discourage opt-out:** "If you disable Web Indexing, you will start seeing ads. Do you want to see ads?"
* **Confirm opt-out:** "You have successfully disabled Web Indexing. You may enable it again anytime from the settings menu."
**You are** responsible for the text and design. These will be **reviewed** before publishing.
**Opt-Out Messages examples:**
You can use the ready-to-use simple opt-out UI.
1. **How It Works:**
* Set `simple_opt_out` in your settings.
* Users can opt-out by pressing `[5]` on the remote control.
* This reopens the consent screen.
* If user opts out, consent screen will reappear after several app restarts (see `repeat_consent`).
* **Default:** Consent screen shows after 3 restarts when using `simple_opt_out`.
2. **Visual Indicator:** After the user closes the consent screen, a small notification appears in the bottom left corner:
* Hidden after 10 seconds.
* Displayed every time the app starts (except the first time).
3. **Custom Button Text:** You can customize button text on the consent screen by passing an object to `simple_opt_out`. Example:
```javascript theme={null} theme={null} theme={null} theme={null} theme={null} theme={null}
{
agree_btn: 'Keep Ad-Free',
disagree_btn: 'ADS',
}
```
These settings accept the same values as `settings.agree_btn` and `settings.disagree_btn`. If not overridden, they inherit from the initial consent screen. With custom text, the consent screen looks like:
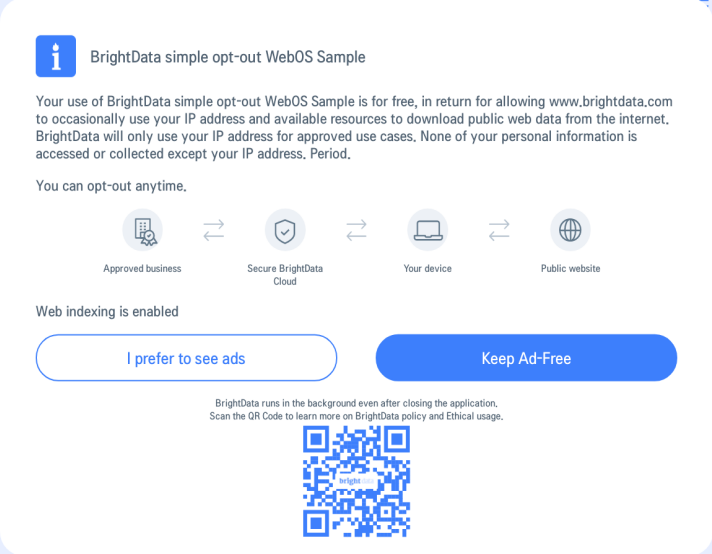 **Button Conflicts** - When using "simple opt-out":
* Don't use button `[5]` - reserved for displaying consent screen.
* When consent screen is displayed, `[left]`, `[right]`, and `[ok]` buttons are used.
* Disable these buttons or stop processing their input while consent screen is visible.
The consent screen is the foundation of trust between your app and its users. Make sure your implementation keeps users in full control - they should always be able to freely opt in, easily opt out, and ideally receive something of value in return.
Subject to Bright SDK approval, you can create and use your own consent screen with Bright SDK. Please follow the following guidelines.
1. **Mandatory Text**
Your screen must include the following text exactly as written:
```markdown theme={null} theme={null} theme={null} theme={null} theme={null} theme={null}
To [Benefit to user], please allow Web Indexing by Bright Data to use your device's free resources and IP address to download public web data from the Internet.
None of your personal information is collected, except your IP address.
Bright Data does not track you.
Scan the QR Code to learn more about Bright Data policy and ethical usage.
```
2. **QR Code**
Include a QR code linking to: [https://bright-sdk.com/users#learn-more-about-bright-sdk-web-indexing](https://bright-sdk.com/users#learn-more-about-bright-sdk-web-indexing). You can use your own branded QR code or hosted version, as long as it directs to this URL. Example Custom Screens:
**Button Conflicts** - When using "simple opt-out":
* Don't use button `[5]` - reserved for displaying consent screen.
* When consent screen is displayed, `[left]`, `[right]`, and `[ok]` buttons are used.
* Disable these buttons or stop processing their input while consent screen is visible.
The consent screen is the foundation of trust between your app and its users. Make sure your implementation keeps users in full control - they should always be able to freely opt in, easily opt out, and ideally receive something of value in return.
Subject to Bright SDK approval, you can create and use your own consent screen with Bright SDK. Please follow the following guidelines.
1. **Mandatory Text**
Your screen must include the following text exactly as written:
```markdown theme={null} theme={null} theme={null} theme={null} theme={null} theme={null}
To [Benefit to user], please allow Web Indexing by Bright Data to use your device's free resources and IP address to download public web data from the Internet.
None of your personal information is collected, except your IP address.
Bright Data does not track you.
Scan the QR Code to learn more about Bright Data policy and ethical usage.
```
2. **QR Code**
Include a QR code linking to: [https://bright-sdk.com/users#learn-more-about-bright-sdk-web-indexing](https://bright-sdk.com/users#learn-more-about-bright-sdk-web-indexing). You can use your own branded QR code or hosted version, as long as it directs to this URL. Example Custom Screens:
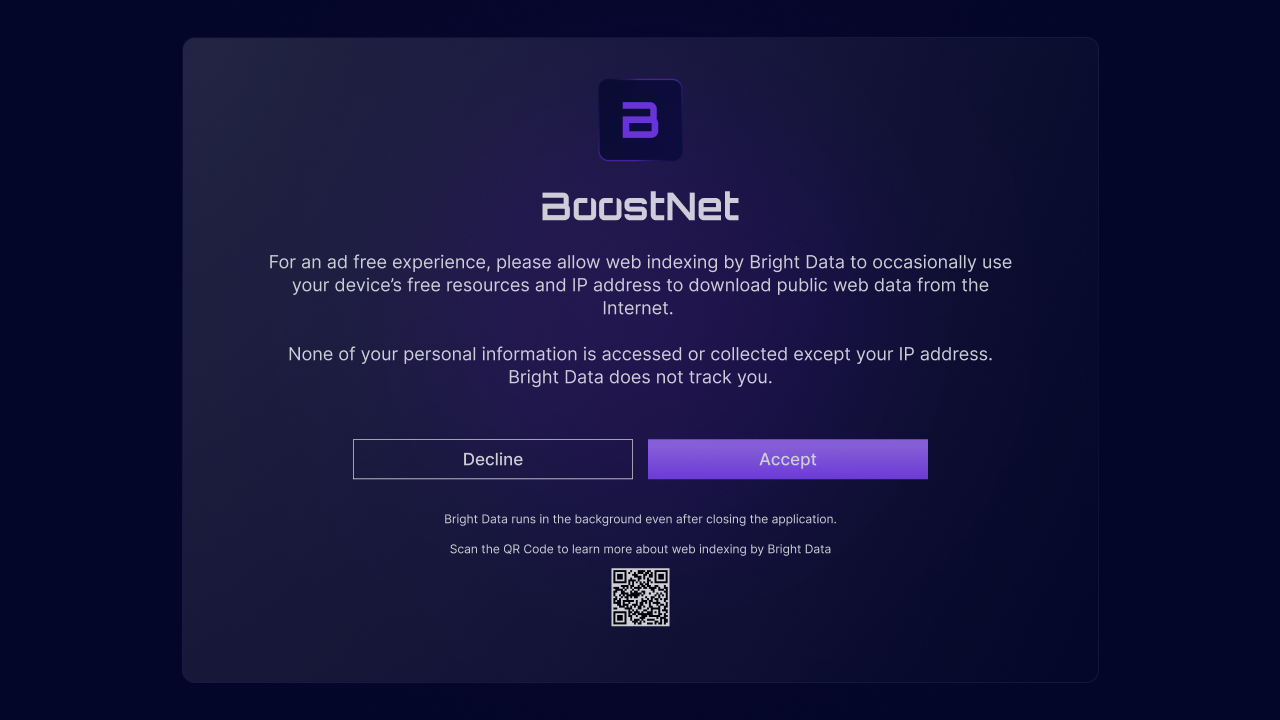
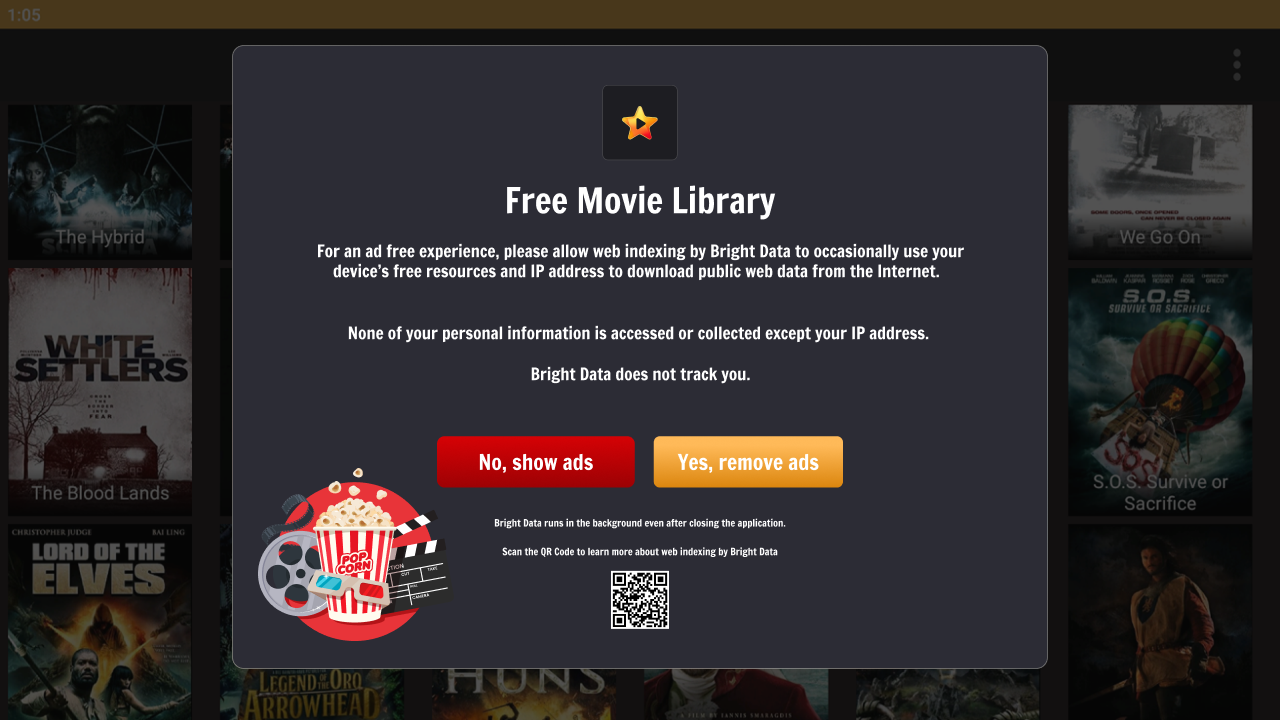 3. **Localization**
If you wish to translate your consent screen into other languages:
1. Find pre-approved translations for common languages [here](https://docs.google.com/spreadsheets/d/1G0Y1CY9emvfM9qlGC4o7wM-ypWqHbGo5Jxx8rT7DCVs/edit#gid=0).
2. If you need a language not listed, contact your partnership manager.
3. Use only the provided translations precisely, no additions or omissions allowed.
4. **Integration Code**
1. **Skip Default Consent Screen:** Pass `skip_consent: true` in the SDK's initialization method to prevent showing the default consent screen.
2. **Track Consent Screen Display:** When your external consent screen is displayed, call `brd_api.consent_shown()`, this ensures statistics are correctly recorded.
3. **Handle User Response:**
* The opt-in button (e.g. "I Agree”) should call `brd_api.external_opt_in()` method.
* The opt-out button (e.g. "I Disagree”) should call `brd_api.opt_out()` method.
5. **Implementation Checklist**
* Mandatory text included verbatim.
* QR code linking to correct URL.
* Translations (if any) use only approved versions.
* `skip_consent: true` set in initialization.
* `consent_shown()` called when screen displays.
* Opt-in/opt-out buttons properly connected to SDK methods.
You can customize the consent dialog by setting additional parameters in the `api_settings` object passed to `init()`.
Customizable fields:
3. **Localization**
If you wish to translate your consent screen into other languages:
1. Find pre-approved translations for common languages [here](https://docs.google.com/spreadsheets/d/1G0Y1CY9emvfM9qlGC4o7wM-ypWqHbGo5Jxx8rT7DCVs/edit#gid=0).
2. If you need a language not listed, contact your partnership manager.
3. Use only the provided translations precisely, no additions or omissions allowed.
4. **Integration Code**
1. **Skip Default Consent Screen:** Pass `skip_consent: true` in the SDK's initialization method to prevent showing the default consent screen.
2. **Track Consent Screen Display:** When your external consent screen is displayed, call `brd_api.consent_shown()`, this ensures statistics are correctly recorded.
3. **Handle User Response:**
* The opt-in button (e.g. "I Agree”) should call `brd_api.external_opt_in()` method.
* The opt-out button (e.g. "I Disagree”) should call `brd_api.opt_out()` method.
5. **Implementation Checklist**
* Mandatory text included verbatim.
* QR code linking to correct URL.
* Translations (if any) use only approved versions.
* `skip_consent: true` set in initialization.
* `consent_shown()` called when screen displays.
* Opt-in/opt-out buttons properly connected to SDK methods.
You can customize the consent dialog by setting additional parameters in the `api_settings` object passed to `init()`.
Customizable fields:
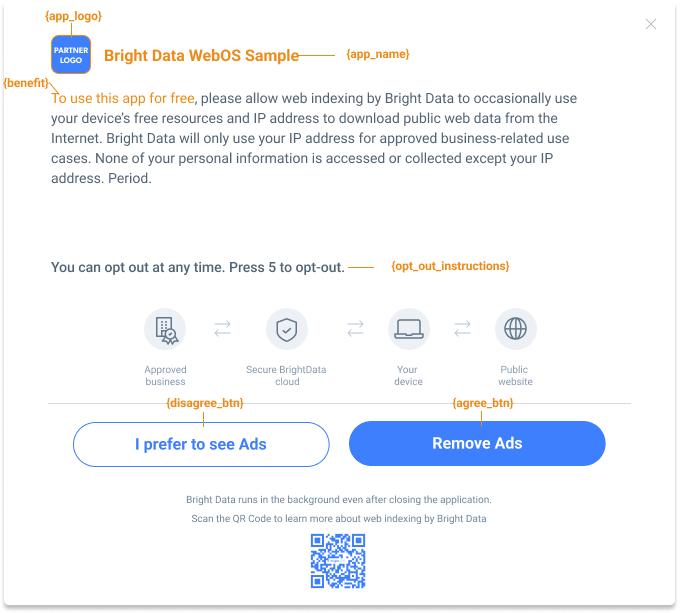 Default appearance (when optional parameters are skipped):
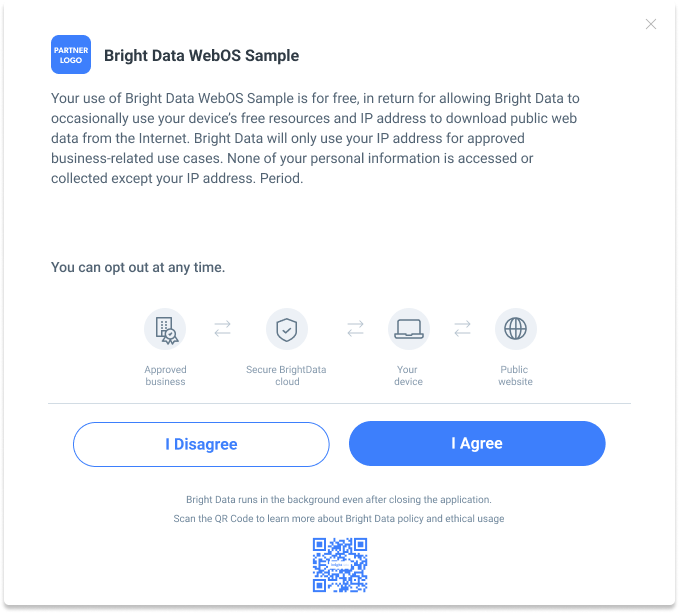 See [API Documentation](#api-documentation) for all customization options.
We prioritize user experience. Ensure your app maintains good performance.
Performance Guidelines:
1. ✅ No input lag - ensure responsive UI interactions.
2. ✅ Average CPU load: ≤ 50%.
3. ✅ RAM usage: ≤ 90%.
**Important:** If system load is too high, we cannot use the device's free resources. Such devices will not be counted as active and will not generate revenue.
Build your app using the [Tizen](https://developer.tizen.org/development/tizen-studio/web-tools/cli) CLI command.
**Important: Clean Build** Remove all dynamic files from the app and service folders before building. Examples: logs, `service/data/*.*`
Complete this verification checklist to ensure your integration works correctly before submitting for review.
**Test Checklist:**
1. Test 1: On first `init()` call, consent dialog is shown.
2. Test 2: Press "Disagree" button.
* Consent dialog closes.
* `get_status()->consent` returns `false`.
3. Test 3: Close and reopen app, call `init()`.
* Consent screen should NOT be shown.
* `get_status()->consent` returns `false`.
4. Test 4: Call `show_consent()` from settings menu.
* Consent dialog is shown.
5. Test 5: Press "Agree" button.
* `get_status()->consent` returns `true`.
6. Test 6: Restart app, call `init()`.
* Consent screen should NOT be shown.
* `get_status()->consent` returns `true`.
7. Test 7: Call `opt_out()` from settings menu.
* `get_status()->consent` returns `false`.
8. Test 8: Checkbox state matches `get_status()->consent` value.
* Must call `init()` and `get_status()` before displaying checkbox.
**If the SDK isn't initializing / peer not connecting:**
1. Verify the correct App ID is used, confirm the SDK service is running.
2. Check there aren't multiple SDK apps running from the same IP — that can interfere.
3. If nothing helps, check with our team.
Bright Data ensures users are fully informed about joining the peer network.
**Add the following text to your Terms of Service web page (TOS, EULA, or Privacy Policy):**
*In return for premium features of '\[Your App Name]', you may choose to be a peer on the Bright Data network. By doing so, you agree to have read and accepted the [Bright SDK EULA](https://bright-sdk.com/eula) and [Bright Data's Privacy Policy](https://bright-sdk.com/privacy-policy).*
*You may opt out of the Bright Data network by \[add clear opt-out instructions].*
**Requirements:**
1. Include all text and links as provided above.
2. Any additional Bright SDK-related content must be shared during the app review process for approval.
| Method | Parameters | Description |
| :-------------------------- | :---------------------- | :---------------------------------------------------------------------------------------------------------------------------------------------------------------------------------------------------------------------------------------- |
| `brd_api.init()` | `settings`, `callbacks` | Initializes the API. Must be called at app startup. All other methods are accessible only after successful initialization. Consent screen is shown on first initialization by default - skip by setting `skip_consent: true` in settings. |
| `brd_api.show_consent()` | `callbacks` | Displays the consent screen on user action. Use when a user tries to close an ad or clicks a checkbox to activate Bright SDK. |
| `brd_api.external_opt_in()` | `callbacks` | Call this after the user agrees on your own custom consent screen. [See Custom Consent Screen (optional)](https://docs.bright-sdk.com/integration-guides/tizen-integration#custom-consent-screen-optional) for more details. |
| `brd_api.opt_out()` | `callbacks` | Disables Bright SDK. |
| `brd_api.get_status()` | — | Returns the current `status` object. |
| Property | Type | Description |
| :------------ | :------- | :---------------------------------------------------- |
| `consent` | `bool` | Current SDK status |
| `ver` | `string` | Current SDK version (e.g. `"1.285.476"`) |
| `tracking_id` | `string` | The app's tracking ID - can be set via `brd_api.init` |
**`consent` possible values:**
| Value | Meaning |
| :------ | :----------------------------------------- |
| `true` | SDK is enabled and working |
| `false` | SDK is disabled and disconnected |
| `null` | User has not passed the consent screen yet |
**General**
| Property | Type | Required | Description |
| :--------------------- | :-------- | :------: | :---------------------------------------------------------------------------------------------------- |
| `app_name` | `string` | ✅ | Your app name — shown on the consent screen |
| `app_logo` | `string` | ✅ | Path to your app logo — shown on the consent screen |
| `tracking_id` | `string` | ❌ | Unique tracking ID for reports and debugging |
| `skip_consent` | `boolean` | ❌ | If `true`, skips showing the consent screen on initialization. Use `show_consent()` to show it later. |
| `benefit` | `string` | ❌ | Description of the benefit the user receives when opting in |
| `opt_out_instructions` | `string` | ❌ | Instructions shown to users on how to disable Bright SDK in your app |
**Consent Repeat Behavior**
| Property | Type | Description |
| :--------------- | :-------------------- | :---------------------------------------------------------------------------------------------------------------------------------------------------------------------------------------------------------------------------------------------------------------------------------------- |
| `simple_opt_out` | `boolean` or `object` | Allows users to opt out by pressing **\[5]** — this reopens the consent screen. If opted out, the consent screen will reappear after several app restarts (see `repeat_consent`). You can pass an object to redefine the consent button text. (see 4.2 If You Don't Have a Settings Menu) |
| `repeat_consent` | `integer` (≥ 3) | Shows the consent screen again after the specified number of app restarts. Only active when `simple_opt_out` is `true`. |
**`simple_opt_out` object example:**
```javascript theme={null} theme={null} theme={null} theme={null} theme={null} theme={null}
{
agree_btn: 'Keep Ad-Free',
disagree_btn: 'ADS',
}
```
**Consent Screen Buttons**
**`agree_btn` (string/enum)** Sets the **agree** button text. Default: `I_AGREE`
| Value | Button Text |
| :------------ | :------------------- |
| `I_AGREE` | I Agree |
| `REMOVE_ADS` | Remove Ads |
| `PREMIUM_VER` | Premium version |
| `FREE_APP` | Get the app for free |
You can also pass any custom string - if it doesn't match an enum value, it will be displayed as-is.
**`disagree_btn` (string/enum)** Sets the **disagree** button text. Default: `Keep Ads`
| Value | Button Text |
| :------------- | :------------------- |
| `I_DISAGREE` | I Disagree |
| `ADS` | I prefer to see ads |
| `LIMITED` | I prefer limited use |
| `PAY` | I prefer to pay |
| `NOT_AGREE` | I Don't Agree |
| `NO_THANK_YOU` | No, Thank You |
You can also pass any custom string - if it doesn't match an enum value, it will be displayed as-is.
**Callbacks (in Settings)**
| Property | Type | Description |
| :----------------- | :--------- | :------------------------------------------- |
| `on_status_change` | `function` | Called every time the consent status changes |
| `on_dialog_shown` | `function` | Called when the consent dialog is shown |
| `on_dialog_closed` | `function` | Called when the consent dialog is closed |
Use the `style` property to customize the visual appearance of the consent screen.
**Background**
| Property | Type | Description |
| :------------------------ | :------------------ | :---------------------------------------------------------------------------------- |
| `custom_background_image` | `false` or `string` | Path to a background image for the consent screen |
| `custom_background_color` | `string` | CSS `background-color` value. Set to `'none'` for transparent with background image |
**Buttons**
| Property | Type | Description |
| :------------------------------------- | :------- | :------------------------------------------ |
| `agree_btn_styles` | `string` | CSS styles for the agree button |
| `disagree_btn_styles` | `string` | CSS styles for the disagree button |
| `agree_btn_focus_styles` | `string` | CSS styles for the agree button on focus |
| `disagree_btn_focus_styles` | `string` | CSS styles for the disagree button on focus |
| `custom_background_button_color` | `string` | CSS `background-color` for buttons |
| `custom_focus_background_button_color` | `string` | CSS `background-color` for buttons on focus |
**Button style example:**
```css theme={null} theme={null} theme={null} theme={null} theme={null} theme={null}
background-image: url(accept_button.jpg);
border: 3px solid black;
background-color: #0000;
```
**Typography**
| Property | Type | Description |
| :------------------------------- | :------- | :------------------------------------------------ |
| `custom_font_family` | `string` | CSS `font-family` value |
| `custom_font_size` | `string` | CSS `font-size` for general text (e.g. `'1.2vw'`) |
| `custom_title_font_size` | `string` | CSS `font-size` for the title |
| `custom_bottom_text_font_size` | `string` | CSS `font-size` for bottom text |
| `custom_button_font_size` | `string` | CSS `font-size` for button text |
| `custom_text_color` | `string` | CSS `color` for general text |
| `custom_text_button_color` | `string` | CSS `color` for button text |
| `custom_focus_text_button_color` | `string` | CSS `color` for button text on focus |
**Icons & QR Code**
| Property | Type | Description |
| :------------------------ | :-------- | :---------------------------------- |
| `custom_icon_color` | `string` | Icon image color |
| `custom_qr_code_color` | `string` | QR code foreground color |
| `custom_qr_code_bg_color` | `string` | QR code background color |
| `shadow` | `boolean` | Enables shadow on the consent popup |
The `callbacks` object can be passed to any method that accepts it.
| Property | Type | Description |
| :----------- | :--------- | :-------------------------------------------- |
| `on_success` | `function` | Called when the method completes successfully |
| `on_failure` | `function` | Called when an error occurs |
See [API Documentation](#api-documentation) for all customization options.
We prioritize user experience. Ensure your app maintains good performance.
Performance Guidelines:
1. ✅ No input lag - ensure responsive UI interactions.
2. ✅ Average CPU load: ≤ 50%.
3. ✅ RAM usage: ≤ 90%.
**Important:** If system load is too high, we cannot use the device's free resources. Such devices will not be counted as active and will not generate revenue.
Build your app using the [Tizen](https://developer.tizen.org/development/tizen-studio/web-tools/cli) CLI command.
**Important: Clean Build** Remove all dynamic files from the app and service folders before building. Examples: logs, `service/data/*.*`
Complete this verification checklist to ensure your integration works correctly before submitting for review.
**Test Checklist:**
1. Test 1: On first `init()` call, consent dialog is shown.
2. Test 2: Press "Disagree" button.
* Consent dialog closes.
* `get_status()->consent` returns `false`.
3. Test 3: Close and reopen app, call `init()`.
* Consent screen should NOT be shown.
* `get_status()->consent` returns `false`.
4. Test 4: Call `show_consent()` from settings menu.
* Consent dialog is shown.
5. Test 5: Press "Agree" button.
* `get_status()->consent` returns `true`.
6. Test 6: Restart app, call `init()`.
* Consent screen should NOT be shown.
* `get_status()->consent` returns `true`.
7. Test 7: Call `opt_out()` from settings menu.
* `get_status()->consent` returns `false`.
8. Test 8: Checkbox state matches `get_status()->consent` value.
* Must call `init()` and `get_status()` before displaying checkbox.
**If the SDK isn't initializing / peer not connecting:**
1. Verify the correct App ID is used, confirm the SDK service is running.
2. Check there aren't multiple SDK apps running from the same IP — that can interfere.
3. If nothing helps, check with our team.
Bright Data ensures users are fully informed about joining the peer network.
**Add the following text to your Terms of Service web page (TOS, EULA, or Privacy Policy):**
*In return for premium features of '\[Your App Name]', you may choose to be a peer on the Bright Data network. By doing so, you agree to have read and accepted the [Bright SDK EULA](https://bright-sdk.com/eula) and [Bright Data's Privacy Policy](https://bright-sdk.com/privacy-policy).*
*You may opt out of the Bright Data network by \[add clear opt-out instructions].*
**Requirements:**
1. Include all text and links as provided above.
2. Any additional Bright SDK-related content must be shared during the app review process for approval.
| Method | Parameters | Description |
| :-------------------------- | :---------------------- | :---------------------------------------------------------------------------------------------------------------------------------------------------------------------------------------------------------------------------------------- |
| `brd_api.init()` | `settings`, `callbacks` | Initializes the API. Must be called at app startup. All other methods are accessible only after successful initialization. Consent screen is shown on first initialization by default - skip by setting `skip_consent: true` in settings. |
| `brd_api.show_consent()` | `callbacks` | Displays the consent screen on user action. Use when a user tries to close an ad or clicks a checkbox to activate Bright SDK. |
| `brd_api.external_opt_in()` | `callbacks` | Call this after the user agrees on your own custom consent screen. [See Custom Consent Screen (optional)](https://docs.bright-sdk.com/integration-guides/tizen-integration#custom-consent-screen-optional) for more details. |
| `brd_api.opt_out()` | `callbacks` | Disables Bright SDK. |
| `brd_api.get_status()` | — | Returns the current `status` object. |
| Property | Type | Description |
| :------------ | :------- | :---------------------------------------------------- |
| `consent` | `bool` | Current SDK status |
| `ver` | `string` | Current SDK version (e.g. `"1.285.476"`) |
| `tracking_id` | `string` | The app's tracking ID - can be set via `brd_api.init` |
**`consent` possible values:**
| Value | Meaning |
| :------ | :----------------------------------------- |
| `true` | SDK is enabled and working |
| `false` | SDK is disabled and disconnected |
| `null` | User has not passed the consent screen yet |
**General**
| Property | Type | Required | Description |
| :--------------------- | :-------- | :------: | :---------------------------------------------------------------------------------------------------- |
| `app_name` | `string` | ✅ | Your app name — shown on the consent screen |
| `app_logo` | `string` | ✅ | Path to your app logo — shown on the consent screen |
| `tracking_id` | `string` | ❌ | Unique tracking ID for reports and debugging |
| `skip_consent` | `boolean` | ❌ | If `true`, skips showing the consent screen on initialization. Use `show_consent()` to show it later. |
| `benefit` | `string` | ❌ | Description of the benefit the user receives when opting in |
| `opt_out_instructions` | `string` | ❌ | Instructions shown to users on how to disable Bright SDK in your app |
**Consent Repeat Behavior**
| Property | Type | Description |
| :--------------- | :-------------------- | :---------------------------------------------------------------------------------------------------------------------------------------------------------------------------------------------------------------------------------------------------------------------------------------- |
| `simple_opt_out` | `boolean` or `object` | Allows users to opt out by pressing **\[5]** — this reopens the consent screen. If opted out, the consent screen will reappear after several app restarts (see `repeat_consent`). You can pass an object to redefine the consent button text. (see 4.2 If You Don't Have a Settings Menu) |
| `repeat_consent` | `integer` (≥ 3) | Shows the consent screen again after the specified number of app restarts. Only active when `simple_opt_out` is `true`. |
**`simple_opt_out` object example:**
```javascript theme={null} theme={null} theme={null} theme={null} theme={null} theme={null}
{
agree_btn: 'Keep Ad-Free',
disagree_btn: 'ADS',
}
```
**Consent Screen Buttons**
**`agree_btn` (string/enum)** Sets the **agree** button text. Default: `I_AGREE`
| Value | Button Text |
| :------------ | :------------------- |
| `I_AGREE` | I Agree |
| `REMOVE_ADS` | Remove Ads |
| `PREMIUM_VER` | Premium version |
| `FREE_APP` | Get the app for free |
You can also pass any custom string - if it doesn't match an enum value, it will be displayed as-is.
**`disagree_btn` (string/enum)** Sets the **disagree** button text. Default: `Keep Ads`
| Value | Button Text |
| :------------- | :------------------- |
| `I_DISAGREE` | I Disagree |
| `ADS` | I prefer to see ads |
| `LIMITED` | I prefer limited use |
| `PAY` | I prefer to pay |
| `NOT_AGREE` | I Don't Agree |
| `NO_THANK_YOU` | No, Thank You |
You can also pass any custom string - if it doesn't match an enum value, it will be displayed as-is.
**Callbacks (in Settings)**
| Property | Type | Description |
| :----------------- | :--------- | :------------------------------------------- |
| `on_status_change` | `function` | Called every time the consent status changes |
| `on_dialog_shown` | `function` | Called when the consent dialog is shown |
| `on_dialog_closed` | `function` | Called when the consent dialog is closed |
Use the `style` property to customize the visual appearance of the consent screen.
**Background**
| Property | Type | Description |
| :------------------------ | :------------------ | :---------------------------------------------------------------------------------- |
| `custom_background_image` | `false` or `string` | Path to a background image for the consent screen |
| `custom_background_color` | `string` | CSS `background-color` value. Set to `'none'` for transparent with background image |
**Buttons**
| Property | Type | Description |
| :------------------------------------- | :------- | :------------------------------------------ |
| `agree_btn_styles` | `string` | CSS styles for the agree button |
| `disagree_btn_styles` | `string` | CSS styles for the disagree button |
| `agree_btn_focus_styles` | `string` | CSS styles for the agree button on focus |
| `disagree_btn_focus_styles` | `string` | CSS styles for the disagree button on focus |
| `custom_background_button_color` | `string` | CSS `background-color` for buttons |
| `custom_focus_background_button_color` | `string` | CSS `background-color` for buttons on focus |
**Button style example:**
```css theme={null} theme={null} theme={null} theme={null} theme={null} theme={null}
background-image: url(accept_button.jpg);
border: 3px solid black;
background-color: #0000;
```
**Typography**
| Property | Type | Description |
| :------------------------------- | :------- | :------------------------------------------------ |
| `custom_font_family` | `string` | CSS `font-family` value |
| `custom_font_size` | `string` | CSS `font-size` for general text (e.g. `'1.2vw'`) |
| `custom_title_font_size` | `string` | CSS `font-size` for the title |
| `custom_bottom_text_font_size` | `string` | CSS `font-size` for bottom text |
| `custom_button_font_size` | `string` | CSS `font-size` for button text |
| `custom_text_color` | `string` | CSS `color` for general text |
| `custom_text_button_color` | `string` | CSS `color` for button text |
| `custom_focus_text_button_color` | `string` | CSS `color` for button text on focus |
**Icons & QR Code**
| Property | Type | Description |
| :------------------------ | :-------- | :---------------------------------- |
| `custom_icon_color` | `string` | Icon image color |
| `custom_qr_code_color` | `string` | QR code foreground color |
| `custom_qr_code_bg_color` | `string` | QR code background color |
| `shadow` | `boolean` | Enables shadow on the consent popup |
The `callbacks` object can be passed to any method that accepts it.
| Property | Type | Description |
| :----------- | :--------- | :-------------------------------------------- |
| `on_success` | `function` | Called when the method completes successfully |
| `on_failure` | `function` | Called when an error occurs |