
- Register your app in the dashboard.
- Integrate Bright VPN bundle.
- Final review.
Bright Data must review your application before you start distributing your app with a bundle offer.
Important Notes
- Users must ALWAYS decide if they want to VOLUNTARILY install EarnApp after seeing the offer and consent screen. Additionally, users should ALWAYS have a straightforward means to opt out of the installation process.
- Take care when implementing the offer screen and the opt-out mechanisms in a way which follows guidelines in this document.
- Follow consent screen implementation guidelines in order to return true value from user interaction. DO NOT install anything on users’ devices if they have not opted-in.
- Bright Data products do not do any user tracking of any kind. You can read more about EarnApp and privacy in its FAQ.
- It’s important to follow the guidelines in this document to avoid violation of our company’s policy which may lead to termination of agreement.
Register Your App in the Dashboard
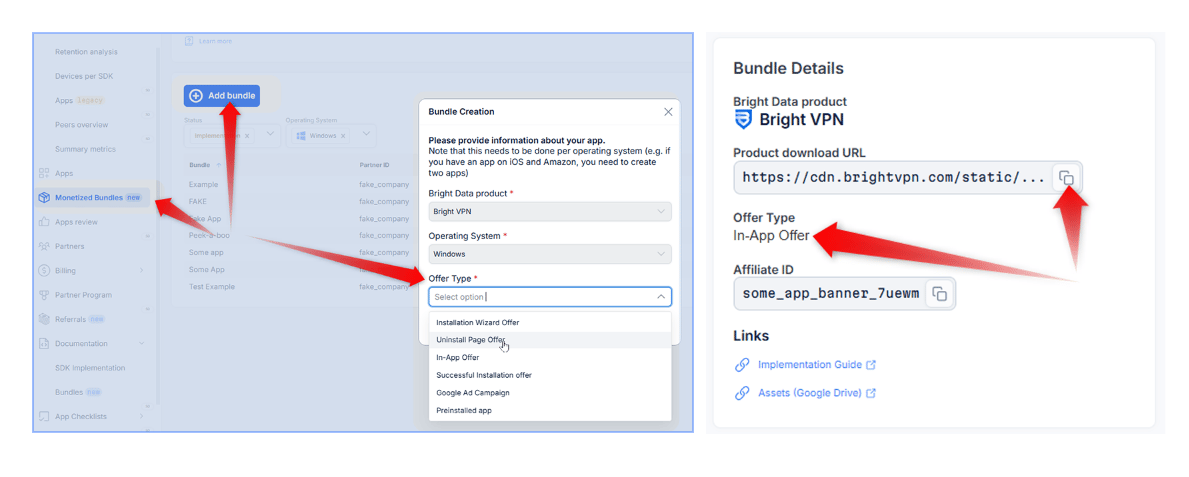
- Go to Monetized Bundles → Click on the (+) Add Bundle button (top of the page).
- In the Bundle Creation popup: Choose the Product you would like to promote, the Operating System your app is offered in, and the Offer Type from the dropdown menu (description of each is available under the offer type box).
- Under “URL” enter the current download link of your app for our team to review.
- Click “Create” button.
As part of our service to select partners, we include them in the respected AppEsteem certification program, recognized by major AV vendors. Once implementation is confirmed and installs look good, we’ll notify you to begin.
Bright SDK covers the entire certification process and maintenance - at no cost to you!
Choose Your Offer Type
Scenario 1 – Installation Wizard Offer
Offer your users the benefits of Bright VPN by adding a screen to your install wizard.- Promotional offer is shown within product installation wizard (start with offer screen setup and then implement exe file).
- User clicks Agree.
- exe file downloads in the background.
- Bright VPN setup is launched and presents the Bright SDK consent screen only after your app installation is complete.
For offer screen setup and technical integration, continue to Set Up Your Offer Screen and Technical Integration.
Scenario 2 – Uninstall Webpage Offer
Earn revenue from users who choose to uninstall your product by presenting a Bright VPN install offer on your product’s uninstall page.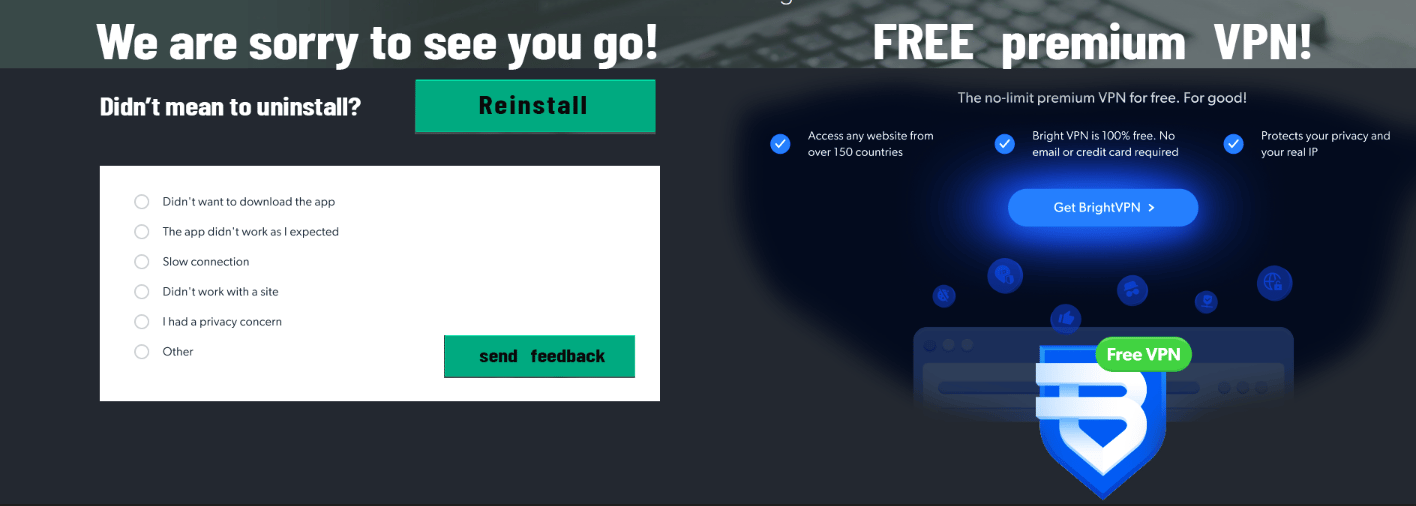
- User uninstalls your app and is redirected to an uninstall page on your website.
- A short message alongside an offer banner is shown. Get your dedicated custom link under “Bundle Details” on your dashboard app page and implement it onto CTA. Contact info@brightvpn.com for further assistance.
- exe file downloads → Bright VPN is installed.
- Bright VPN is launched and presents Bright SDK consent screen.
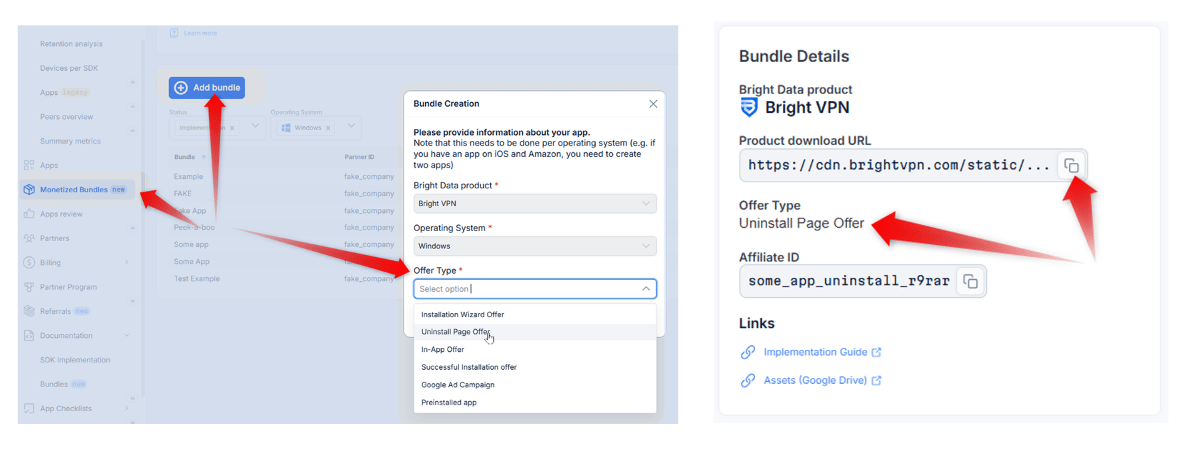
- Go to Monetized Bundles → Add Bundle → Choose “Uninstall Page Offer” → Press “Create”.
- In “Bundle Details”, confirm Offer Type shows “Uninstall Page Offer” → copy download URL to implement onto your CTA.
Scenario 3 – Successful Install Page
Earn revenue from users who successfully installed your product by presenting a Bright VPN install offer on your product’s successful installation page.- Once your app is fully installed - direct your user to a welcome/successful install page on your website.
- A short message alongside an offer banner is shown (like Scenario 2 mockup). Get your dedicated custom link under “Bundle Details” on your dashboard app page and implement it onto CTA. Contact info@brightvpn.com for further assistance.
- exe file downloads → Bright VPN is installed.
- Bright VPN is launched and presents Bright SDK consent screen.
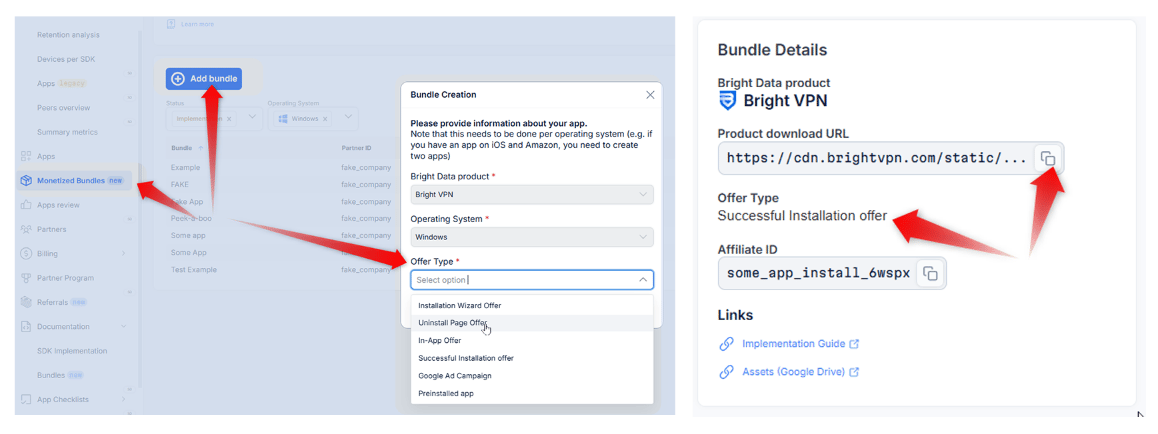
- Go to Monetized Bundles → Add Bundle → Choose “Successful Installation Page Offer” → Press “Create”.
- In “BundleDetails”, confirm Offer Type shows “Successful Installation Page Offer” → copy download URL to implement onto your CTA.
Scenario 4 – Ad Campaign
Create an ad campaign offering to install Bright VPN - get paid for every install you bring!- Once your app is fully installed - direct your user to a welcome/successful install page on your website.
- A short message alongside an offer banner is shown (like Scenario 2 mockup). Get your dedicated custom link under “Bundle Details” on your dashboard app page and implement it onto CTA. Contact info@brightvpn.com for further assistance.
- exe file downloads → Bright VPN is installed.
- Bright VPN is launched and presents Bright SDK consent screen.
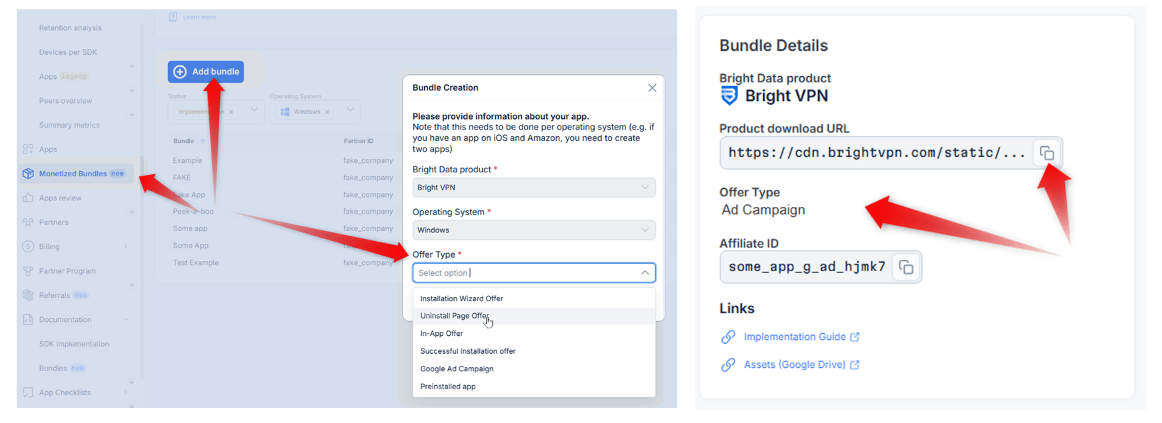
- Go to Monetized Bundles → Add Bundle → Choose “Ad Campaign” → Press “Create”.
- In “BundleDetails”, confirm Offer Type shows “AdCampaign” → copy download URL to implement onto your campaign.
Scenario 5 – In-App Offer
Present a Bright VPN install (banner/popup, etc.) within your app.- An offer is presented within the app screen.
- User clicks offer.
- exe file downloads → Bright VPN is installed.
- Bright VPN is launched and presents Bright SDK consent screen.
- Description: Clear and short - “Free Premium VPN for secure Browsing!”.
- Buttons: Must include an “Install” or “Accept” button. If using a popup/ad, also include a “Decline” or “No Thanks” button.
- Links:
- Privacy Policy: https://brightvpn.com/legal/privacy.
- EULA: https://brightvpn.com/legal/sla.
- Go to Monetized Bundles → Add Bundle → Choose “In-App Offer” → Press “Create”.
- In “Bundle Details”, confirm Offer Type shows “In-App Offer” → copy download URL to implement onto your offer.
Scenario 6 – Preinstalled App
Install Bright VPN on products you distribute (refurbished products, device manufacturers, OEM, etc.).- Contact us for more information.
For the preinstalled app scenario, you can disregard all other instructions that come after this section.
Set Up Your Offer Screen
Optional: You may design the opt-in any way you choose (we recommend the design to be as close as possible to your installation wizard). However, the Bright VPN offer screen must always include an opt-in consent screen with the mandatory text below.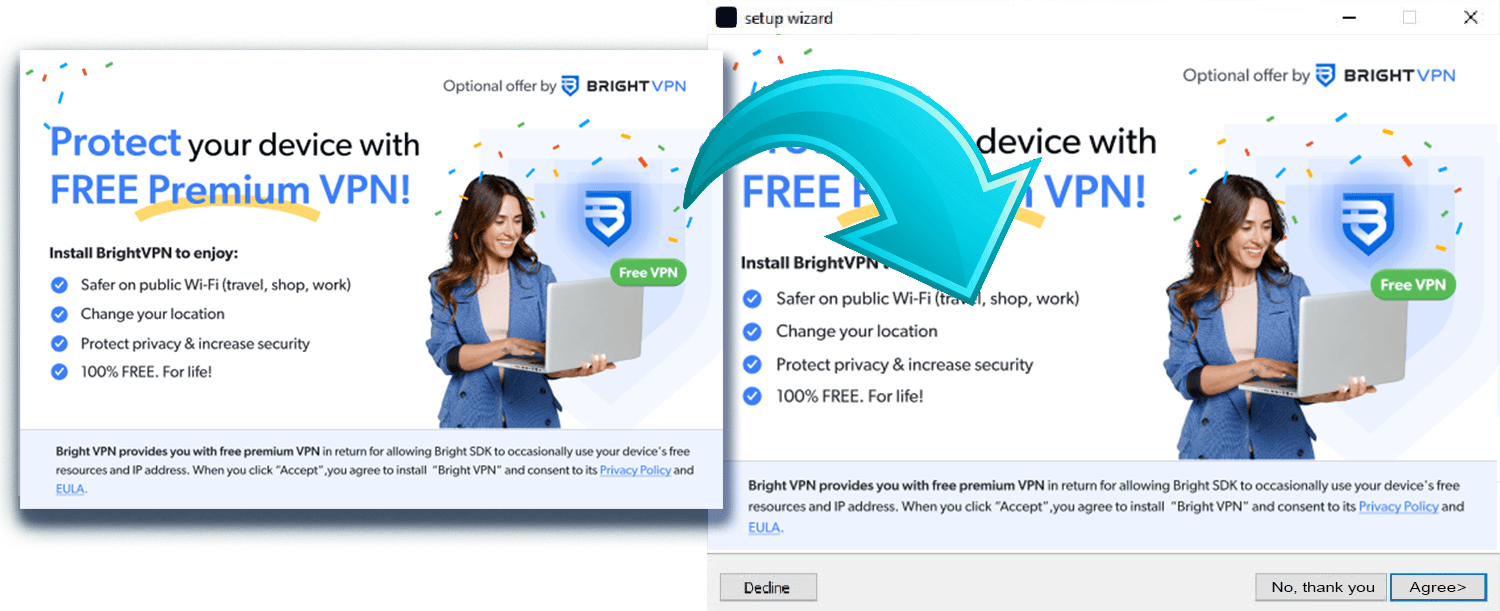
- You may implement the Bright VPN offer screen onto your wizard (make sure to include all the links provided below).
- Available with buttons or without buttons (so you can use the ones in your Wizard) - make sure buttons return true value from user interaction.
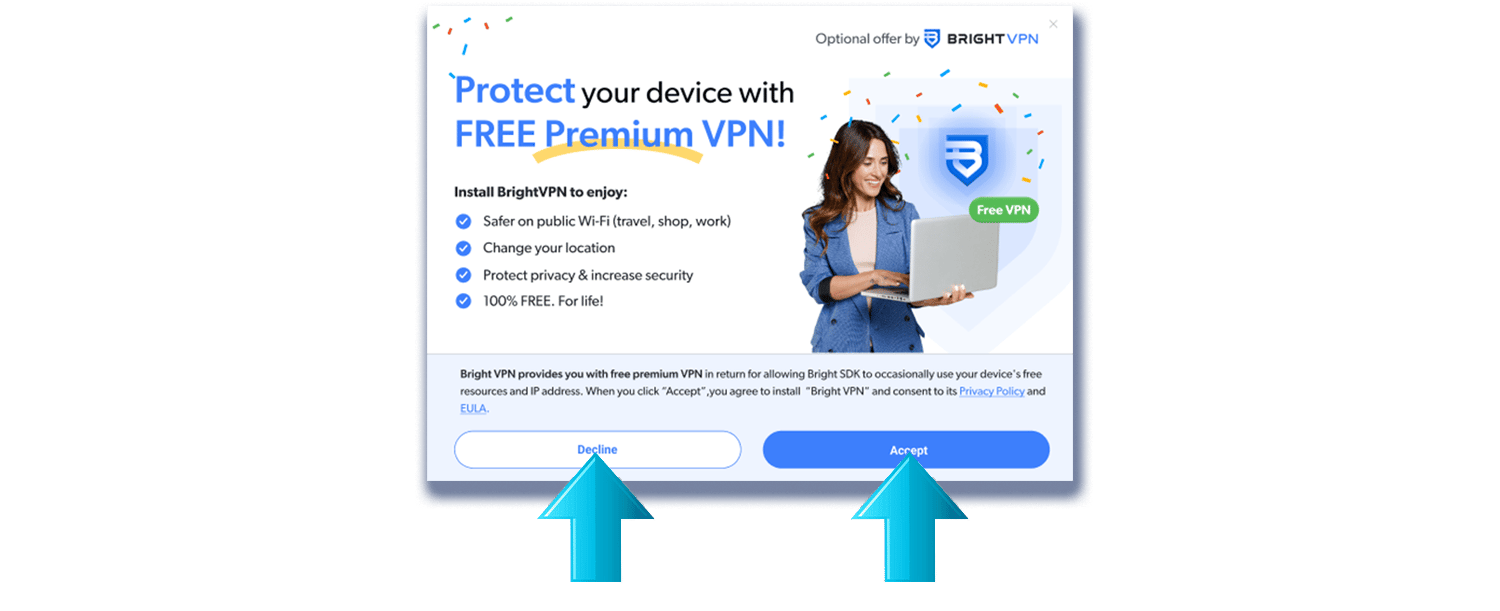
- In case you want to design your own Bright VPN offer, please read below.
- In the Assets section you may find all the imagery needed.
- Mandatory Text
Optional offer by
 Protect your device with FREE Premium VPN! Install Bright VPN to enjoy: Safer on public Wi-Fi (travel, shop, work) Change your location Protect privacy & increase security 100% FREE. For life!
Bright VPN provides you with free premium VPN in return for allowing Bright SDK to occasionally use your device’s free resources and IP address. When you click “Accept”, you agree to install “Bright VPN” and consent to its Privacy Policy and EULA.
Protect your device with FREE Premium VPN! Install Bright VPN to enjoy: Safer on public Wi-Fi (travel, shop, work) Change your location Protect privacy & increase security 100% FREE. For life!
Bright VPN provides you with free premium VPN in return for allowing Bright SDK to occasionally use your device’s free resources and IP address. When you click “Accept”, you agree to install “Bright VPN” and consent to its Privacy Policy and EULA.
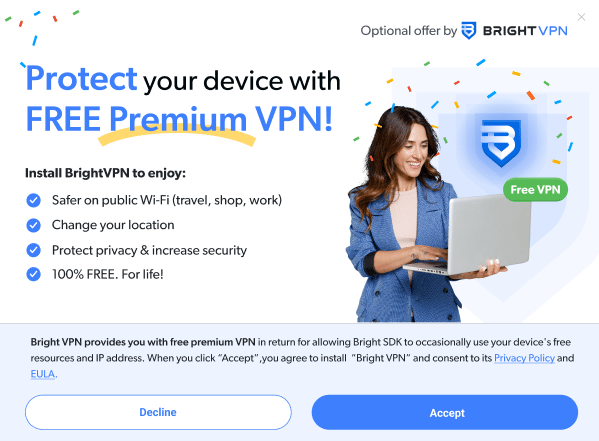
- Buttons “Decline” / “Accept”
- Required Links
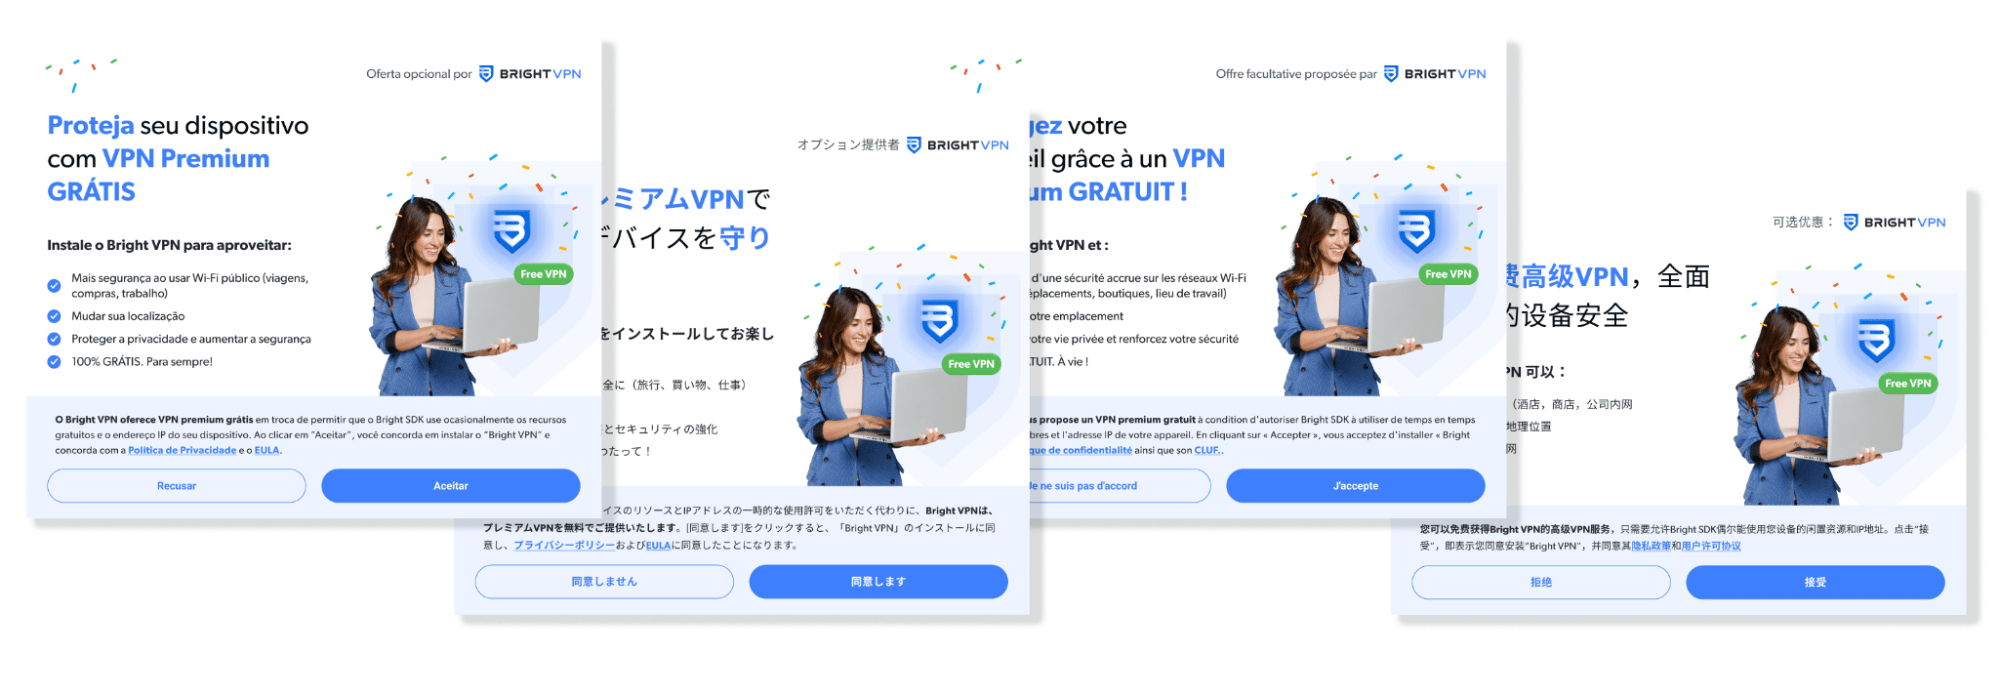
Text URL Bright VPN https://brightvpn.com/ EULA https://brightvpn.com/legal/sla Privacy Policy https://brightvpn.com/legal/privacy - Translations The offer screen is available in multiple languages. Get translations here. Download the offer screen design in all languages here.
AV Guidelines
As mentioned above, it is vital to us to keep all of our partners’ apps certified and cleared from any Anti Virus detection. Based on our experience, and partnership with Appesteem, we will provide some consulting about the implemented flow, to avoid any AV detection.For more details, we recommend you visit this page, and filter the list for “In-bundle offers”, “Bundler-made offers” and “Ads inside apps”.These guidelines were not written specifically for any of Bright Data’s applications, and are relevant for any bundler.
Assets
- Press Kit: Drive folder link.
- Translations: Get translations here / Download offer screen design in all languages here.
Restricted Countries
Important Note before integrating: Due to local restrictions, Bright VPN should not be offered in the following countries and/or regions. Please make sure you disable the offer for:
- Iran
- Iraq
- Syria
- Lebanon
- Palestine
- Russia
- Belarus
- North Korea
- Cuba
- Sudan
- Crimea region of Russia
Technical Integration
- Dynamically download the bundler using the link present in your bundle page in the Bright SDK control panel.
Download URL format:https://cdn.bright-sdk.com/static/BrightSDK-Bundler.exe?filename=BrightVPN-[your_bundle_code].exe
Downloaded filename format:BrightVPN-XXXXX.exe
Example:BrightVPN-zx76b.exeImportant: Make sure that the bundler executable file has your bundle code in its filename - if it isn’t present it will fail. The filename must end with-XXXXX.exe, whereXXXXXis your unique bundle code.Your Affiliate ID can be found under “Bundle Details” → Affiliate ID on your dashboard.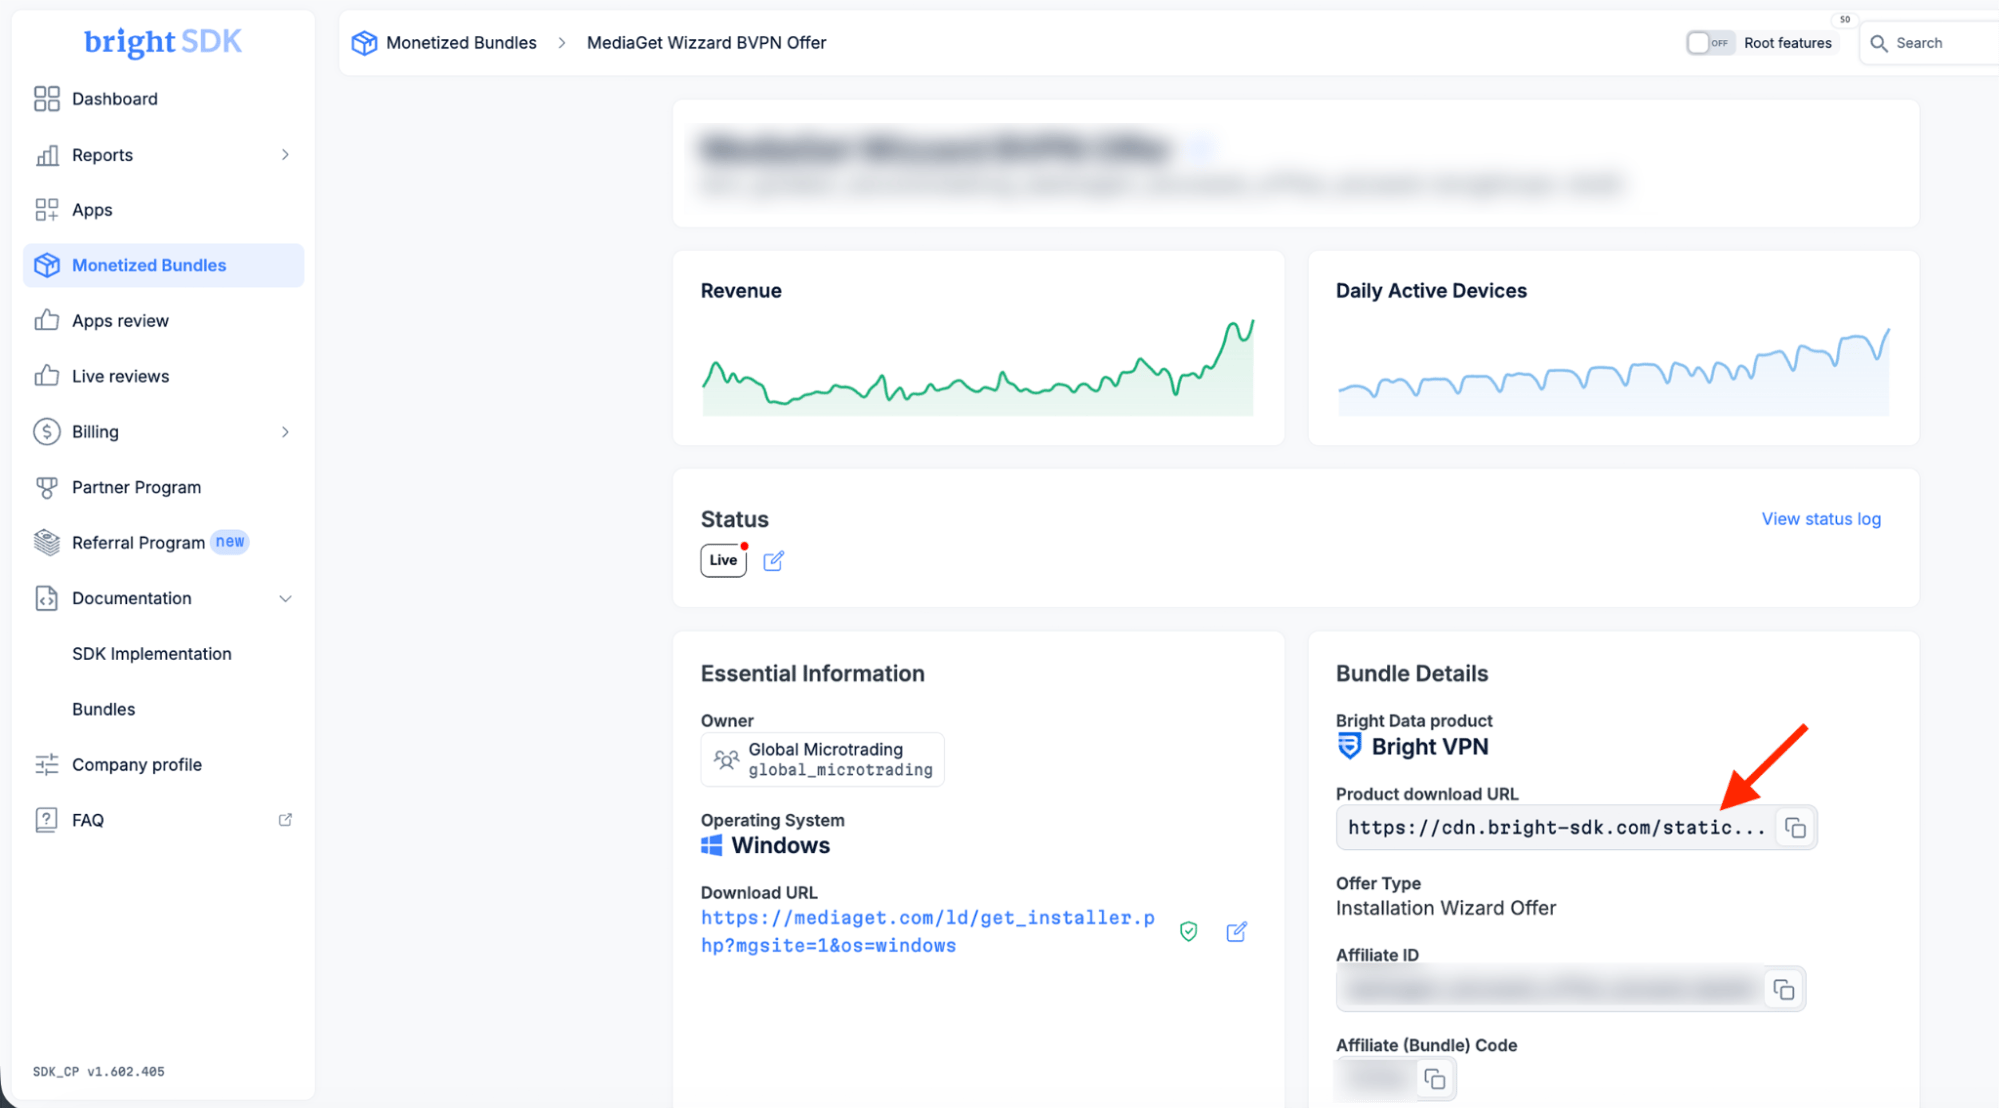
- Save the user’s choice when the offer is displayed.
- Once your installer has finished - if the user clicked “I agree” on the offer screen, run the bundler executable.
Troubleshooting: If you encounter any issues during the installation of the Bundler application, you can access debug logs by executing it through the Windows Command Prompt (CMD). This will assist you in identifying the underlying problem.
- Launch your app’s install wizard.
- Offer is displayed within the wizard (non-intrusive, with product description).
- Privacy Policy and EULA links are visible and clickable:
- Privacy Policy: https://brightvpn.com/legal/privacy.
- EULA: https://brightvpn.com/legal/sla.
- Click “Install” / “Accept” to proceed.
- Your app’s install wizard completes successfully.
- Bright VPN installer launches automatically.
- Bright VPN Consent screen is shown.
- Main Screen of Bright VPN is successfully launched.
Send for Final Review
Once you are done implementing, please upload your exe file for review under the “Review Submission” section in your dashboard app page: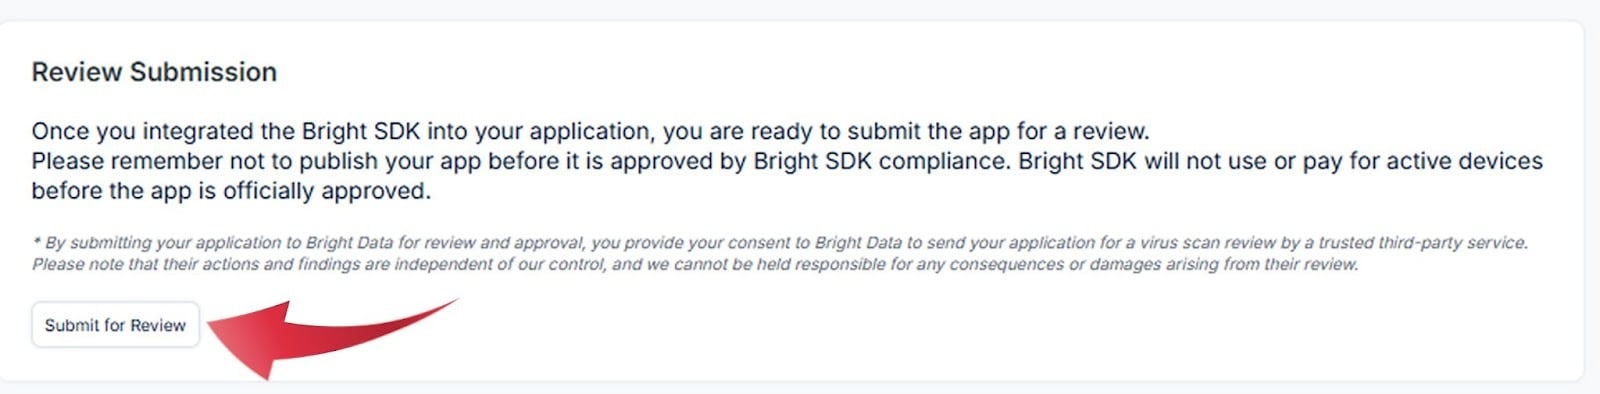
Each offer type (Wizard, successful/uninstall page, in-app, etc.) requires separate dashboard setup and review.
Get Your App Certified!
- We will assess the number of installations in the course of a two-week period and initiate the AppEsteem certification process, for which we will cover the associated costs. Click here to see the list of our partners’ apps that have been certified.
- As part of this process, it is necessary to implement a new signing certificate (this part is the partner’s responsibility).
When you add an offer (Wizard, successful/uninstall page, in-app offer, etc.), most likely you have a new build version. In that case, please share so we can recertify with AppEsteem.
- If you have any inquiries, please feel free to contact our Director of Security Partnerships.
Report and Payment Details
- We invite you to check into the Bright SDK Dashboard, where you can manage your partnership activity, monitor your revenue and have access to other partner program assets.
- In our dashboard, update your billing contact and payment details under “Company Profile”. Learn more about our billing process.
- Our team will notify you once they complete their review and approve your integration - you may then start distributing this build and start monetizing with Hola VPN!
- Once active, your reports and payment details can be found and managed directly in the Bright SDK Dashboard.