
For Unity-specific integration help, refer to the Unity Android SDK Integration Guide.
Adding Bright SDK to most apps takes 15 to 20 minutes.
Adding Bright SDK to most apps takes 15 to 20 minutes.
Requirements
- Latest Bright SDK version for Android.
- Java 8 or higher (
JavaVersion.VERSION_1_8). - Android Studio (latest recommended).
If you are using Java < v8, please contact our technical support.
Important Notes
- Users must always voluntarily decide to opt in after seeing the consent screen, and must always have an easy way to opt out.
- Bright Data reviews SDK integration after initial release and regularly thereafter. Your account will be terminated if you violate the guidelines in this document.
- Bright Data recommends offering value in exchange for opting in (e.g., fewer ads, bonus coins, premium features). However, simply asking for user support is also acceptable.
- Do not upload your APK with Bright SDK to the Google Play Store without prior approval.
Create App ID on Dashboard
If you haven’t done this yet, log in to your dashboard and create your app ID first.
Install SDK Files
You can set up the Bright SDK AAR in your Android app in two ways:
- Using the Bright SDK Gradle Plugin Recommended - automatically authenticates, fetches, downloads, and places the latest
bright_sdk.aarinto your/libsdirectory before every build. - Manually - download the SDK using the BrightSDK Downloader, unzip it, and copy
bright_sdk.aarinto your project’s/libsdirectory yourself.
build.gradle dependencies and add the SDK initialization code to your app.Option A - Using the Gradle Plugin Recommended
Option A - Using the Gradle Plugin Recommended
Add the plugin to your project by following the Bright SDK Gradle Plugin guide.The plugin will:
- Fetch the latest
bright_sdk.aarvia the authenticated BrightSDK API and place it into yourlibs/directory - Cache the file locally to avoid redundant re-downloads
- Auto-inject the SDK and its dependencies (when
useMavenLocal: true), removing the need to manually configureflatDirandfileTree - Run automatically before
preBuildvia theinstallBrightSdkGradle task
Option B - Manual
Option B - Manual
Download the latest Bright SDK using the Bright SDK downloader, and unzip it.SDK StructureSDK Overview
Copy
| Component | Description |
|---|---|
bright_sdk.aar | The main Bright SDK library for Android. Obfuscated. |
bright_sdk.aar into your project’s /libs directory.Configure and Initialize the SDK
Configure Dependencies
Gradle Plugin users: If you used the plugin with
useMavenLocal: true, the flatDir and fileTree configurations are already handled - skip this sub-step.build.gradle file, make the following additions:Add to android block:implementation fileTree(dir: 'libs', include: ['*.aar']) to dependencies block:flatDir { dirs "$rootProject.projectDir/libs" } to allprojects.repositories block:Initialize the SDK
Create a dedicated function
startBrightSdk to set up the SDK. This should be invoked only once on first run.Ensure Single Initialization
startBrightSdk must only be called once. Use savedInstanceState to guard against repeated calls:Encapsulate Application Class Code
This section only applies if you have extended the
Application class or its descendants (e.g., MultiDexApplication). If not, skip to the next section.Application.onCreate() code crashes, it will also crash the SDK service and impact your revenue. To prevent this, exit early when inside the SDK service process:Option 1 - Using SDK helper method Recommended
Option 1 - Using SDK helper method Recommended
Option 2 - Manual process name detection
Option 2 - Manual process name detection
Show Consent on Subscription Cancellation
When a user cancels their subscription, show the Bright SDK consent screen as an alternative:To show the consent dialog at any point (e.g., from Settings, on opt-in request):
Add Opt-In/Out Settings Option
Your app must include a settings option allowing users to opt in or out at any time. This is typically placed in a Settings menu.Opt-Out for Mobile AppsRequirements:When the user toggles on → call Opt-Out for TV AppsRequirements:
See the examples below, illustrating both opted-in and opted-out scenarios:Mobile: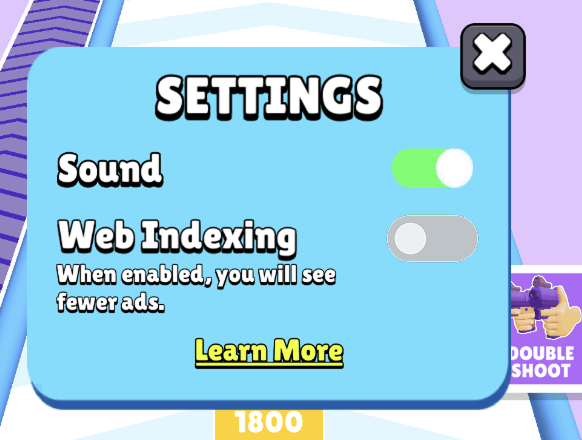
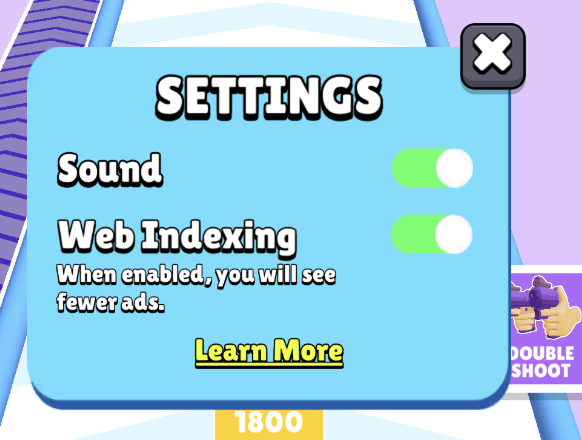
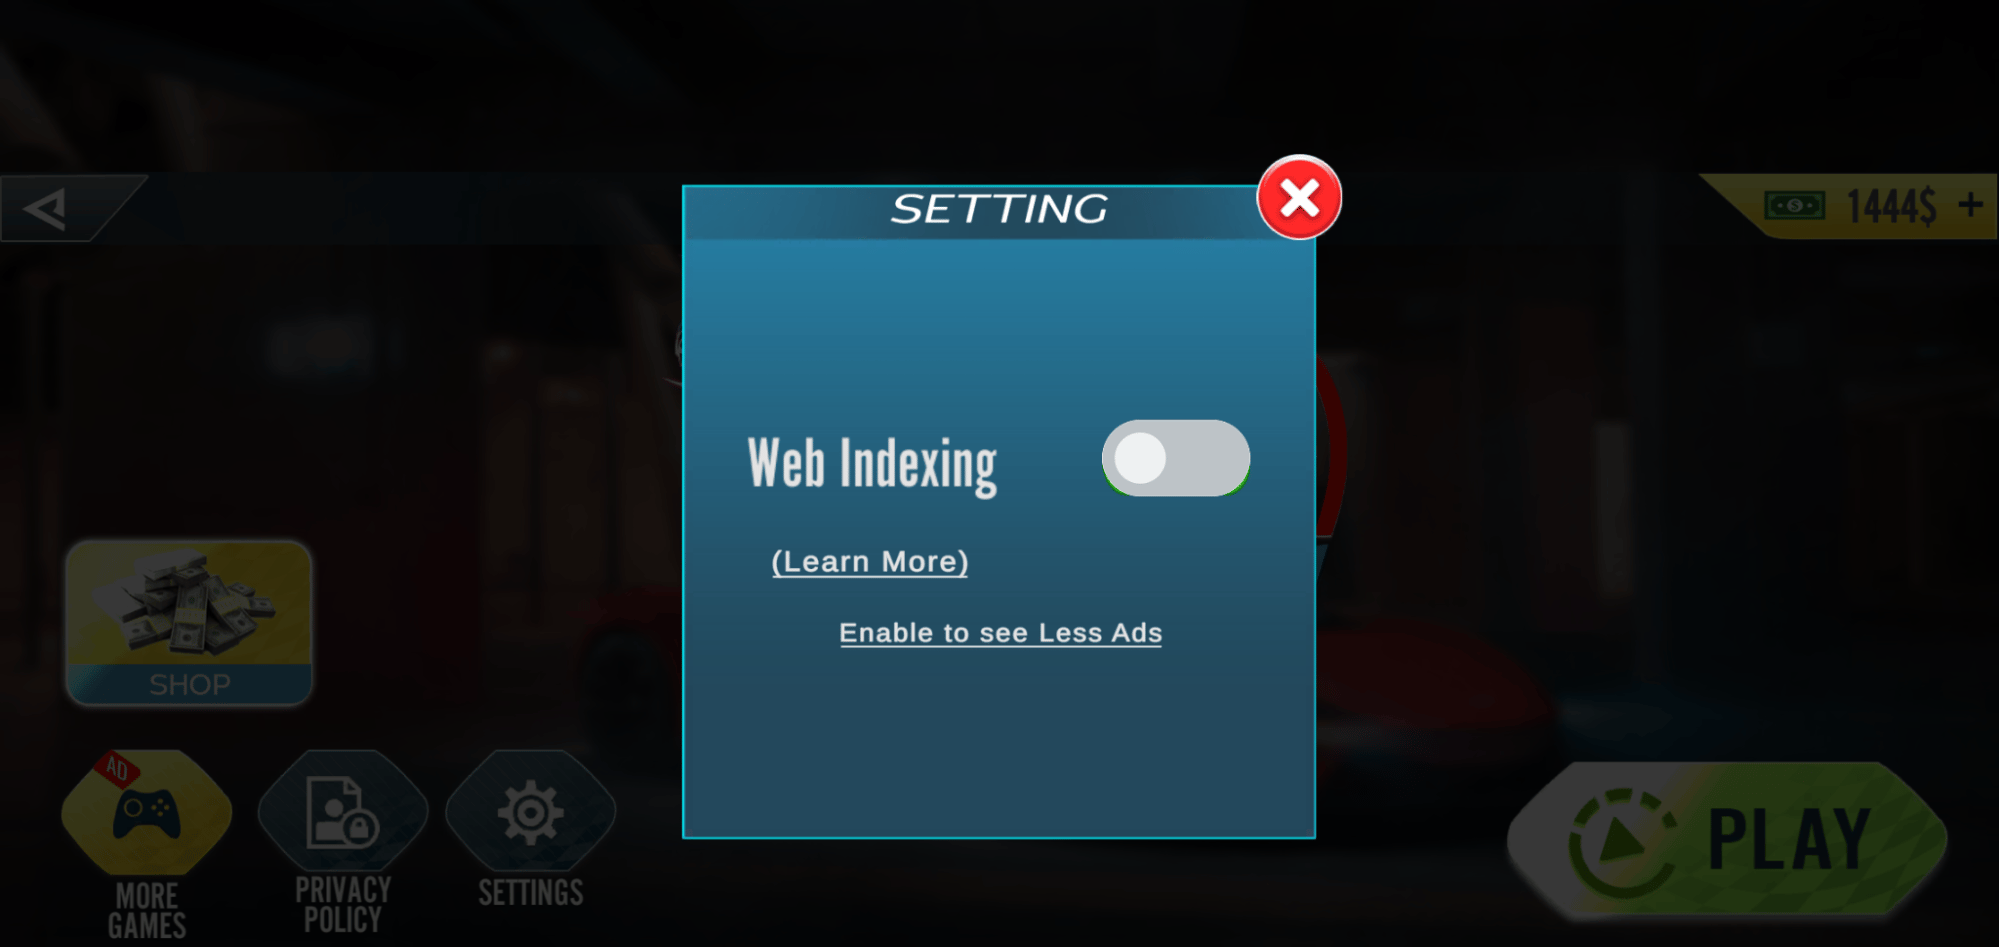
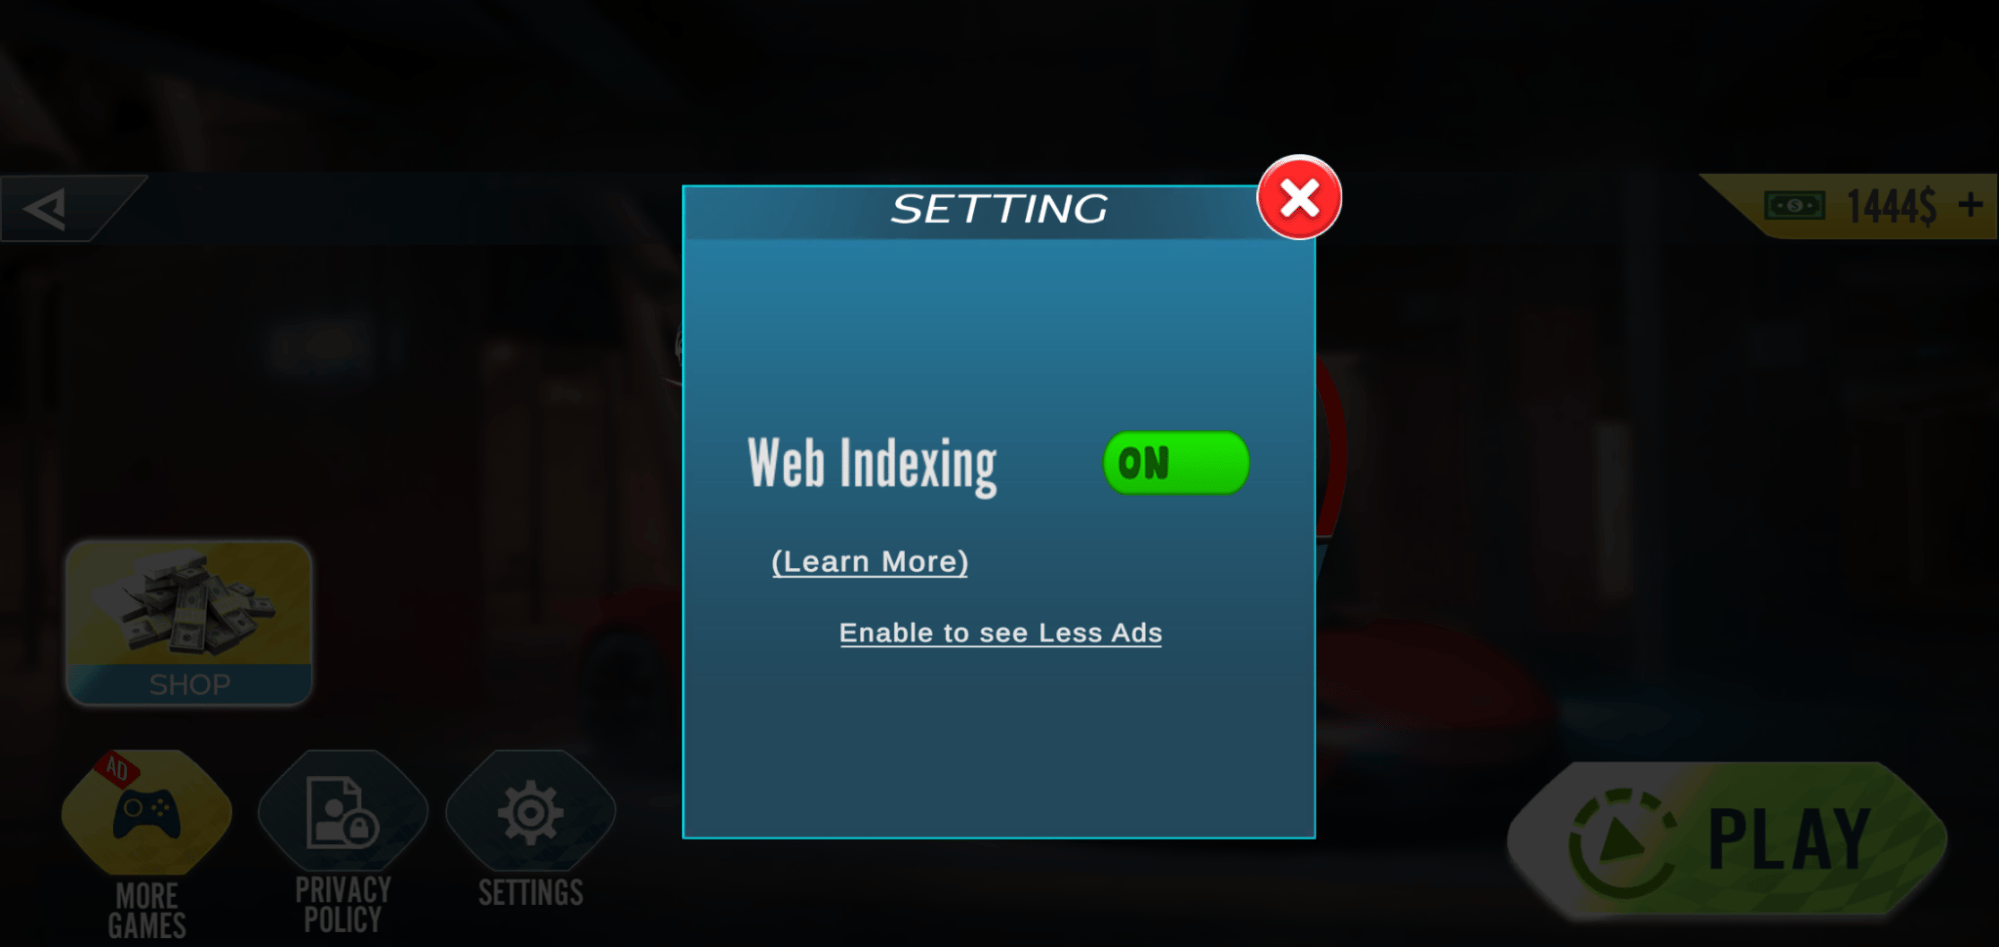
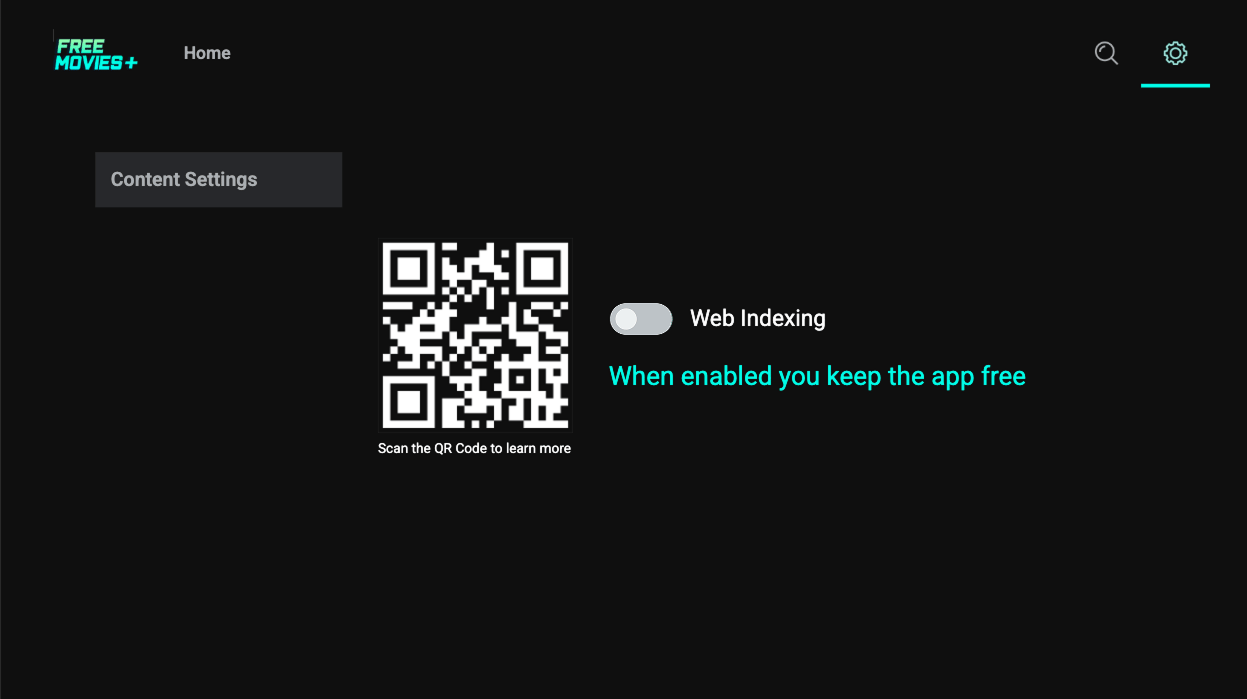
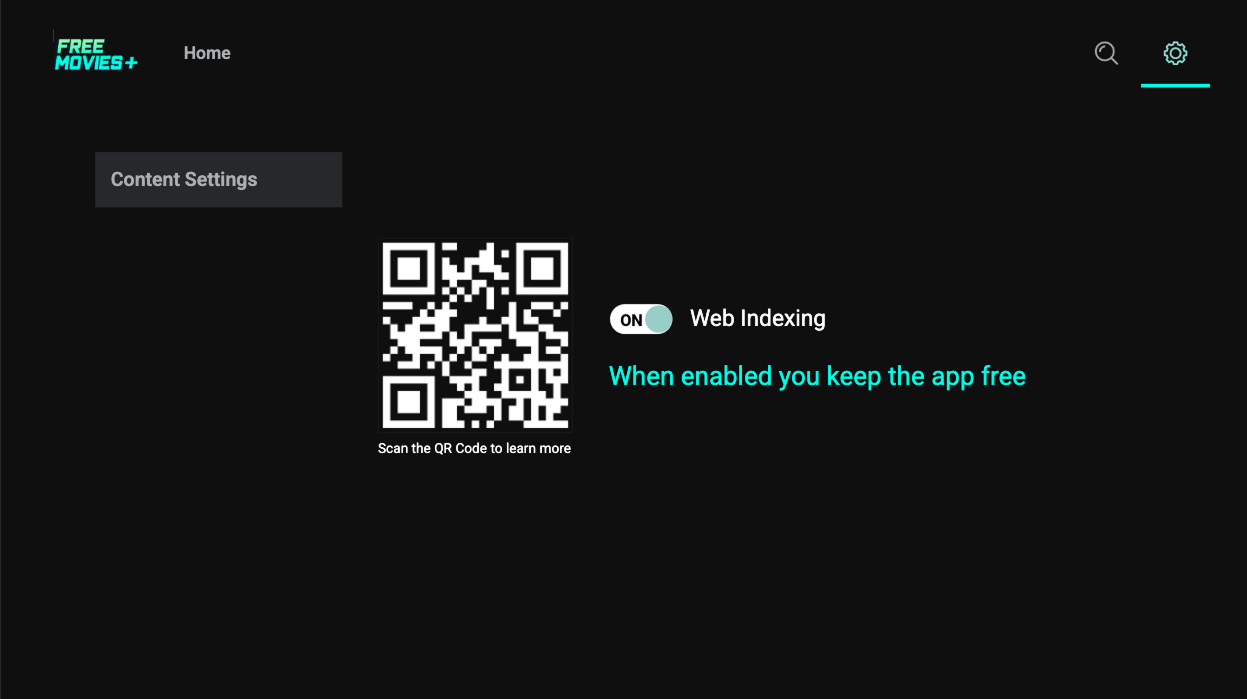
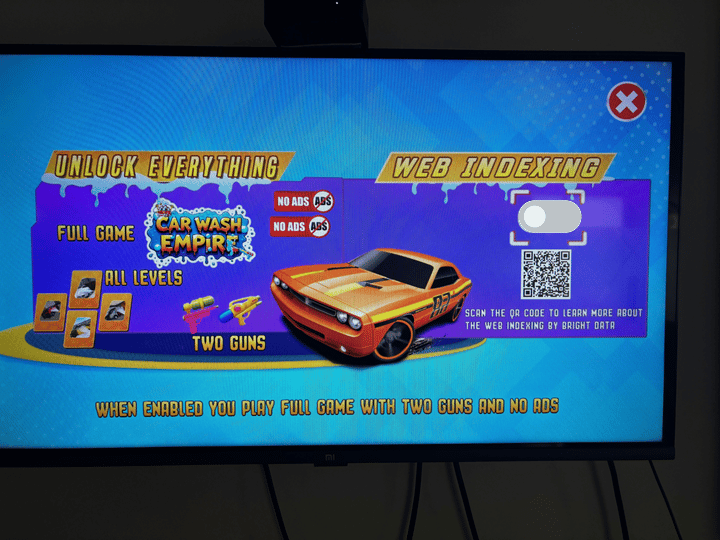
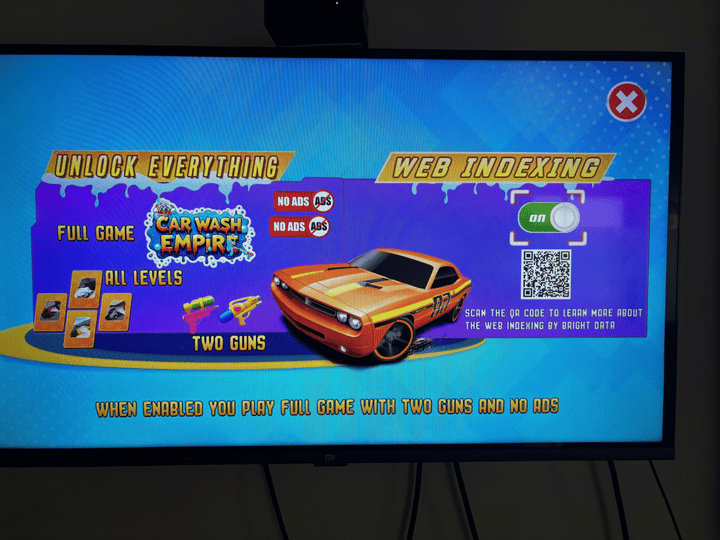
- Add a toggle/switch labeled “Web Indexing” that clearly reflects the current status (opted in or out).
- Below the switch, add text emphasizing the value users receive when opting in (see examples).
- Include a Learn more link that opens: https://bright-sdk.com/users#learn-more-about-bright-sdk-web-indexing.
BrightApi.showConsent(context) to show the consent screen.Note: There is no way to directly opt in. Only the user can decide. You must show the consent screen - opt-in happens automatically only if the user agrees.
- Add a toggle/switch labeled “Web Indexing” that clearly reflects the current status.
- Below the switch, add text emphasizing the value users receive when opting in.
- Include a QR code linking to: https://bright-sdk.com/users#learn-more-about-bright-sdk-web-indexing.
- The QR code must be accompanied by the instruction: “Scan the QR Code to learn more about web indexing by Bright Data.”.
- You may use your own branded QR code, or the hosted version.
You may add a confirmation dialog to discourage opting out (e.g., “If you disable Web Indexing, you will start seeing ads. Continue?”)
| State | Example text |
|---|---|
| Opted out | ”Enable to see fewer ads” |
| Opted out | ”Enable to get 100 extra coins” |
| Opted out | ”Enable to enjoy premium features” |
| Opted in | ”When enabled you see fewer ads” |
| Opted in | ”When enabled you get 100 extra coins” |
Refrain from using technical terms like “opt in” / “opt out” — always speak in terms of user value.
| Issue | Guidance |
|---|---|
| Label reads “Bright” or “Bright SDK” | Label must read “Web Indexing” |
| No value text | Always include text describing what the user gains |
| No “Learn more” link / QR code | Required — must link to the URL above |
| Switch doesn’t reflect current state | Switch must always show the true current status |
Consent Dialog Customization (Optional)
While the standard Bright SDK consent screen is always available, we highly encourage customization to match your app’s look & feel - this typically leads to higher conversion rates.There are two customization options:
| Option | Description |
|---|---|
CustomConsentSettings | Modify the built-in Bright SDK consent screen |
| External consent screen | Build your own consent UI entirely |
Option 1 - External Consent Screen
Option 1 - External Consent Screen
Option 2 - CustomConsentSettings
Option 2 - CustomConsentSettings
This is what it looks like on the default Bright SDK screen: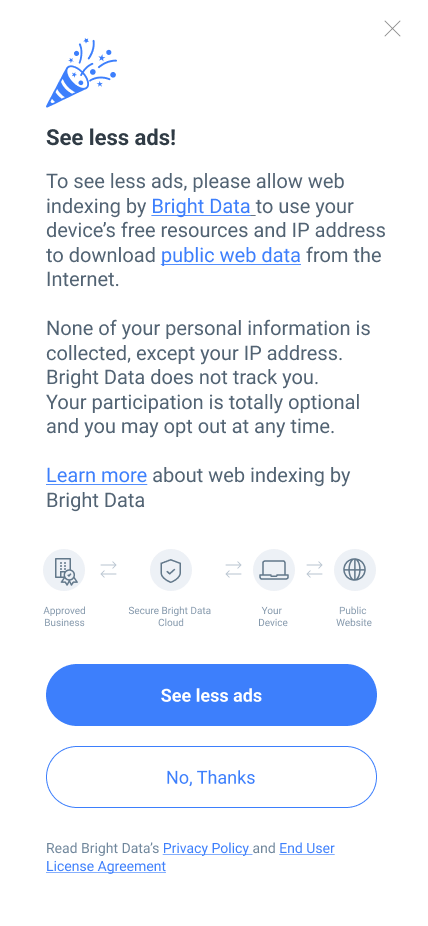
CustomConsentSettings to customize colors, fonts, backgrounds, and button styles:CustomConsentSettings properties in the API Documentation.App Performance
We prioritize user experience. Ensure your app maintains good performance.Performance Guidelines:
- ✅ No input lag - ensure responsive UI interactions.
- ✅ Average CPU load: ≤ 50%.
- ✅ RAM usage: ≤ 90%.
Important: If system load is too high, we cannot use the device’s free resources. Such devices will not be counted as active and will not generate revenue.
Verify Your Integration
- Compile and run your application on a device or emulator
- Click I Agree in the SDK consent dialog
- After a few minutes, search your logs for
cskd/cid - You should see a line similar to:
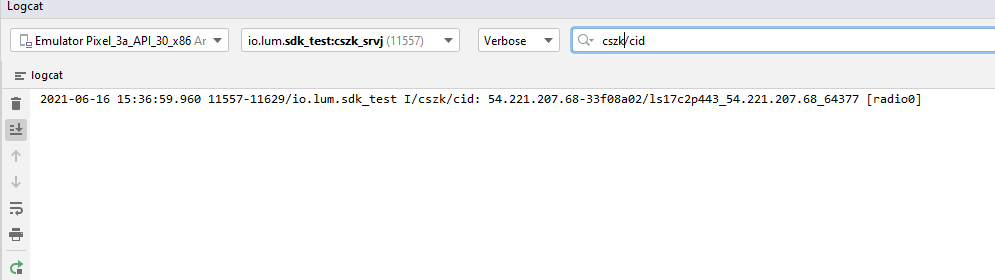
Update Your Terms of Service
Bright Data ensures users are fully informed about joining the peer network.Add the following text to your Terms of Service web page (TOS, EULA, or Privacy Policy):In return for premium features of ‘[Your App Name]’, you may choose to be a peer on the Bright Data network. By doing so, you agree to have read and accepted the Bright SDK EULA and Bright Data’s Privacy Policy.You may opt out of the Bright Data network by [add clear opt-out instructions].Requirements:
- Include all text and links as provided above.
- Any additional Bright SDK-related content must be shared during the app review process for approval.
How to Update the SDK
Option A - Using the Gradle Plugin (Recommended)
Option A - Using the Gradle Plugin (Recommended)
Run your Gradle build as usual. As long as
version is set to "latest" (default), the plugin will automatically detect, download, and replace bright_sdk.aar with the latest version. To force a fresh check, run:Option B - Manual
Option B - Manual
- Download the latest Bright SDK using the Bright SDK downloader, and unzip it.
- Replace
bright_sdk.aarin your/libsfolder with the updated version. - If some methods are not available after updating, use File → Invalidate Caches in Android Studio.
Migrating from API V1 to V2
The V2 API introduces a customizable consent screen. All main V1 methods are deprecated and replaced by
Full V1 example:Full V2 example:
BrightApi.| V1 | V2 |
|---|---|
main.set_tos_url(...) | Handled automatically |
main.set_decline_option(...) | settings.setDisagreeBtn(...) |
main.set_jobid_range(min, max) | settings.setMinJobId(min) + settings.setMaxJobId(max) |
main.set_choice_listener(...) | settings.setOnStatusChange(...) |
main.start(ctx) | BrightApi.init(context, settings) |
main.show_dialog(ctx, false) | BrightApi.showConsent(context) |
API Documentation
BrightApi
Public Methods:
| Method | Description |
|---|---|
static void init(Context context, Settings settings) | Initializes the SDK. Call once in your first activity. Shows consent dialog automatically unless setSkipConsent(true) is set. |
static void showConsent(Activity activity) | Displays the consent dialog. Use when a user tries to close an ad or re-enables Bright SDK from Settings. |
static void showConsent(Activity activity, Settings settings) | Displays the consent dialog with a new settings object. |
static void optOut(Context context) | Revokes the user’s consent and sets Choice.NOT_PEER. Triggers OnStatusChange callback. |
static Boolean getConsentChoice(Context context) | Returns true if user is peer, false if not peer, null if no choice has been made yet. |
static boolean isSvcProcess() | Returns true if the current process is the SDK service process. |
static void setTrackingId(String trackingId) | Adds a unique tracking ID for reports and debugging. Must be called beforeBrightApi.init. |
static void reportConsentShown(Context context) | |
static void reportConsentBackPress(Context context) | |
static void reportConsentOptOut(Context context) |
Settings
Constructor:Public Methods:
| Method | Description |
|---|---|
String getAppId() | Returns Application ID as defined in ApplicationInfo.packageName |
String getAppName() | Returns app name as defined in ApplicationInfo.loadLabel |
void setSkipConsent(boolean skipConsent) | Set true to prevent consent dialog from showing automatically |
void setLanguage(ConsentLanguage language) | Override the device default language |
void setBenefit(String benefit) | Prefix text for the consent dialog (e.g., “To use the app with no ads”) |
void setAgreeBtn(String agreeBtn) | Text for the agree button. Default text used if not set. |
void setDisagreeBtn(String disagreeBtn) | Text for the disagree button. Default text used if not set. |
void setOnStatusChange(OnStatusChange onStatusChange) | Register a callback for user choice changes |
void setMinJobId(int minJobId) | Min job ID for JobScheduler. Default range: 1–1000 |
void setMaxJobId(int maxJobId) | Max job ID for JobScheduler. Default range: 1–1000 |
void setCustomConsentSettings(CustomConsentSettings ccs) | Apply custom consent screen settings |
void setShowAppIcon(boolean showAppIcon) | Show the default app icon on the consent screen |
void setShowAppIcon(boolean showAppIcon, int appLogoResourceId) | Show a custom image resource as the app icon |
void setShowAppIcon(boolean showAppIcon, byte[] imageBytes) | Show a custom image (bytes) as the app icon |
void setOptOutInstructions(String optOutInstructions) | Custom opt-out instructions text |
void setCampaignId(String campaignId) | Set a campaign ID |
void setBackPressListener(Runnable backPressListener) | Listener for back press on consent screen |
CustomConsentSettings
| Method | Description |
|---|---|
setConsentTitle(String) | Set the consent screen title |
setAppTitleTextColor(String) | App title text color |
setAppTitleTypeface(CustomTypeface) | App title font |
setBodyBackgroundColor(String) | Body background color |
setBodyBackgroundImageResource(int) | Body background image (resource ID) |
setBodyBackgroundImageBytes(byte[]) | Body background image (bytes) |
setBodyBackgroundShadow(boolean) | Enable/disable body background shadow |
setScreenBackgroundColor(String) | Screen background color |
setScreenBackgroundImageResource(int) | Screen background image (resource ID) |
setScreenBackgroundImageResource(int, boolean fillScreen) | Screen background image with fill option |
setScreenBackgroundImageBytes(byte[]) | Screen background image (bytes) |
setScreenBackgroundImageBytes(byte[], boolean fillScreen) | Screen background image (bytes) with fill option |
setConsentTextColor(String) | Consent main text color |
setConsentTextTypeface(CustomTypeface) | Consent main text font |
setAgreeButtonImageResource(int) | Agree button image (resource ID) |
setDisagreeButtonImageResource(int) | Disagree button image (resource ID) |
setAgreeButtonImageBytes(byte[]) | Agree button image (bytes) |
setDisagreeButtonImageBytes(byte[]) | Disagree button image (bytes) |
setAgreeButtonTextColor(String) | Agree button text color |
setDisagreeButtonTextColor(String) | Disagree button text color |
setAgreeButtonTypeface(CustomTypeface) | Agree button font |
setDisagreeButtonTypeface(CustomTypeface) | Disagree button font |
setConsentTextLinksColor(String) | Consent text links color |
setAgreeButtonBackgroundColor(String) | Agree button background color |
setDisagreeButtonBackgroundColor(String) | Disagree button background color |
setPrivacyMessageTextColor(String) | Privacy message text color |
setPrivacyMessageLinksColor(String) | Privacy message links color |
setPrivacyMessageTextTypeface(CustomTypeface) | Privacy message font |
setNetworkIconsColorFilter(String) | Network icons color filter |
setNetworkIconsTextColor(String) | Network icons text color |
setNetworkIconsTextTypeface(CustomTypeface) | Network icons text font |
setHideNetworkIcons(boolean) | Show/hide network icons |
setQrCodeColorFilter(String) | QR code foreground color |
setQrCodeBackgroundColor(String) | QR code background color |
setCustomTypeface(CustomTypeface) | Apply font to all text elements (specific overrides take precedence) |
setTopIconColorFilter(String) | Top icon color filter |
setHideConsentIcon(boolean) | Show/hide the consent icon |
CustomTypeface
Constructors:Methods:
| Method | Description |
|---|---|
void setTypeface(Typeface typeface) | Set a Typeface object directly |
void setFontFamily(CustomConsentSettings.CustomFontFamily fontFamily) | Set font family |
void setTextStyle(CustomConsentSettings.CustomTextStyle textStyle) | Set text style |
Choice
| Value | Int | Description |
|---|---|---|
Choice.NONE | 0 | Consent screen not shown yet, or user hasn’t made a choice |
Choice.PEER | 1 | User agreed — reflect in settings so user can opt out |
Choice.NOT_PEER | 4 | User declined — reflect in settings so user can opt in |
CustomFontFamily
Supported values:
casual, cursive, monospace, sans_serif, sans_serif_black, sans_serif_light, sans_serif_medium, sans_serif_smallcaps, sans_serif_thin, sans_serif_condensed, sans_serif_condensed_light, sans_serif_condensed_medium, serif, serif_monospace